
 个人中心
个人中心 退出
退出


过年了,基于Vue做一个消息通知组件
前言
今天除夕,在这里祝大家新年快乐!!!今天在这个特别的日子里我们做一个消息通知组件,好,我们开始行动起来吧!!!
项目一览
效果很简单,就是这种的小卡片似的效果。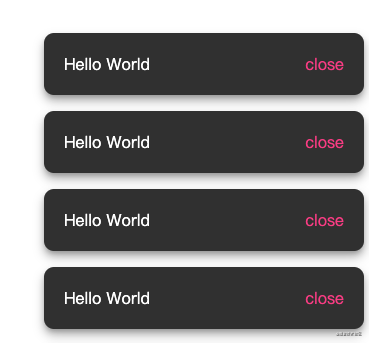
我们先开始写UI页面,可自定义消息内容以及关闭按钮的样式。
Notification.vue
<template>
<transition name="fade" @after-enter="handleAfterEnter">
<div class="notification" :style="style" v-show="visible">
<span class="notification__content">
{{content}}
</span>
<span class="notification__btn" @click="handleClose">{{btn}}</span>
</div>
</transition>
</template>
<script>
export default {
name: 'Notification',
props: {
content: {
type: String,
required: true
},
btn: {
type: String,
default: 'close'
}
}
}
</script>
<style lang="less" scoped>
.fade-enter-active, .fade-leave-active{
transition: opacity 1s;
}
.fade-enter, .fade-leave-to{
opacity: 0;
transform: translateX(100px);
}
.notification{
display: flex;
background-color: #303030;
color: rgba(255, 255, 255, 1);
align-items: center;
padding: 20px;
position: fixed;
min-width: 280px;
box-shadow: 0 3px 5px -1px rgba(0, 0, 0, 0.2), 0px 6px 10px 0px rgba(0, 0, 0, 0.3);
flex-wrap: wrap;
transition: all 0.3s;
border-radius:10px ;
&__content{
padding: 0;
}
&__btn{
color: #ff4081;
padding-left: 24px;
margin-left: auto;
cursor: pointer;
}
}
</style>
写完基本的样式组件,我们该赋予其灵魂了。好,我们开始写最重要的逻辑。
notify.js
import Vue from "vue";
import Notification from "./Notification.vue";
const NotificationConstructor = Vue.extend(Notification);
const instances = [];
let seed = 1;
// 消除Vue实例
const removeInstance = (instance) => {
if (!instance) return;
const len = instances.length;
const index = instances.findIndex((ins) => instance.id === ins.id);
instances.splice(index, 1);
if (len <= 1) return;
const removeHeight = instance.height;
for (let i = index; i < len - 1; i++) {
instances[i].verticalOffset =
parseInt(instances[i].verticalOffset) - removeHeight - 16;
}
};
const notify = (options = {}) => {
if (Vue.prototype.$isServer) return;
// 获取vue实例
let instance = new NotificationConstructor({
propsData: options, // 这里是传进来一组props
data() {
return {
verticalOffset: 0,
timer: null,
visible: false,
height: 0,
};
},
computed: {
// 配置消息组件的位置
style() {
return {
position: "fixed",
right: "20px",
bottom: `${this.verticalOffset}px`,
};
}
},
mounted() {
this.createTimer();
this.$el.addEventListener("mouseenter", () => {
if (this.timer) {
this.clearTimer(this.timer);
}
});
this.$el.addEventListener("mouseleave", () => {
if (this.timer) {
this.clearTimer(this.timer);
}
this.createTimer();
});
},
updated() {
this.height = this.$el.offsetHeight;
},
beforeDestroy() {
this.clearTimer();
},
methods: {
// 创建计时器
createTimer() {
this.timer = setTimeout(() => {
this.visible = false;
document.body.removeChild(this.$el);
removeInstance(this);
this.$destroy();
}, options.timeout || 5000);
},
// 清除计时器
clearTimer() {
if (this.timer) {
clearTimeout(this.timer);
}
},
// 关闭消息弹窗
handleClose() {
this.visible = false;
document.body.removeChild(this.$el);
removeInstance(this);
this.$destroy(true);
},
// 过渡js钩子
handleAfterEnter() {
this.height = this.$el.offsetHeight;
},
},
});
const id = `notification_${seed++}`; // 动态生成唯一Id
instance.id = id;
// 生成vue中的$el
instance = instance.$mount();
// 将$el中的内容插入dom节点中去
document.body.appendChild(instance.$el);
instance.visible = true;
let verticalOffset = 0;
instances.forEach((item) => {
verticalOffset += item.$el.offsetHeight + 16;
});
verticalOffset += 16;
instance.verticalOffset = verticalOffset;
instances.push(instance);
return instance;
};
export default notify;
当消息组件组高度超过浏览器显示区域的时候,消息组件会依次按顺序消失。
在这里,我们使用了Vue.extend(),在这里我们简单地介绍下,官网上是这样介绍的。
使用基础 Vue 构造器,创建一个“子类”。参数是一个包含组件选项的对象。
data 选项是特例,需要注意 - 在 Vue.extend() 中它必须是函数
<div id="app"></div>
// 创建构造器
var Profile = Vue.extend({
template: '<p>{{firstName}} {{lastName}} aka {{alias}}</p>',
data: function () {
return {
firstName: 'Walter',
lastName: 'White',
alias: 'Heisenberg'
}
}
})
// 创建 Profile 实例,并挂载到一个元素上。
new Profile().$mount('#app')
@after-enter="handleAfterEnter",看到这很多小伙伴会有疑问,其实这是Vue过渡组件中 JavaScript 钩子。
官网的解释这样讲。
可以在 attribute 中声明 JavaScript 钩子
<transition
v-on:before-enter="beforeEnter"
v-on:enter="enter"
v-on:after-enter="afterEnter"
v-on:enter-cancelled="enterCancelled"
v-on:before-leave="beforeLeave"
v-on:leave="leave"
v-on:after-leave="afterLeave"
v-on:leave-cancelled="leaveCancelled"
>
<!-- ... -->
</transition>
// ...
methods: {
// --------
// 进入中
// --------
beforeEnter: function (el) {
// ...
},
// 当与 CSS 结合使用时
// 回调函数 done 是可选的
enter: function (el, done) {
// ...
done()
},
afterEnter: function (el) {
// ...
},
enterCancelled: function (el) {
// ...
},
// --------
// 离开时
// --------
beforeLeave: function (el) {
// ...
},
// 当与 CSS 结合使用时
// 回调函数 done 是可选的
leave: function (el, done) {
// ...
done()
},
afterLeave: function (el) {
// ...
},
// leaveCancelled 只用于 v-show 中
leaveCancelled: function (el) {
// ...
}
}
这些钩子函数可以结合 CSS transitions/animations 使用,也可以单独使用。
当只用 JavaScript 过渡的时候,在 enter 和 leave 中必须使用 done 进行回调。否则,它们将被同步调用,过渡会立即完成。
推荐对于仅使用 JavaScript 过渡的元素添加 v-bind:css="false",Vue 会跳过 CSS 的检测。这也可以避免过渡过程中 CSS 的影响。
详情解释可以查看官方文档
整理完UI组件与逻辑文件,下一步做得工作是将它们整合起来,通过Vue命令的方式直接使用。
index.js
import Notification from "./Notification.vue";
import notify from "./notify.js";
export default (Vue) => {
Vue.component(Notification.name, Notification);
Vue.prototype.$notify = notify;
};
下面,我们将使用它。
在main.js中引入index.js文件。
import Notification from "../src/components/notification/index.js";
Vue.use(Notification);
然后,你在相应的组件中这样调用它即可。
this.$notify({
content: "Hello World", // 消息内容
btn: "关闭" // 关闭按钮内容
});
作者:Vam的金豆之路
主要领域:前端开发
我的微信:maomin9761
微信公众号:前端历劫之路
 分类导航
分类导航