使用 Flutter 开发 Chrome 插件【又来抢前端饭碗了】
前言
Flutter3.0推出后,对多平台支持更好且更稳定,今天我们将探索一种将Flutter应用作为Chrome扩展程序的独特运行方式。您可以使用带有--csp标志的HTML渲染器生成Flutter Web构建,并且可以将其用作 chrome扩展。想了解更多信息,请继续。
构建chrome扩展程序
今天,我们将使用一个生成二维码的例子看一下使用Flutter来构建chrome扩展程序。
让我们从创建一个新的 Flutter 项目开始。
项目创建
您可以使用与创建任何基本 Flutter 项目完全相同的 Flutter 命令:
flutter create qr_code_extension
这里,qr_code_extension 是 Flutter 项目的名称。这里的Flutter版本仅供参考,我目前使用的是 Flutter 3.0.1 版。
创建项目后,使用您喜欢的 IDE 打开它,我这里使用 VS Code打开。
如何将这个基本的 Flutter Web 应用程序作为 chrome 扩展程序运行?
仅需要三步即可完成…
1、删除不支持的js脚本
导航到 web/index.html 文件并删除所有 <script>...</script> 标记: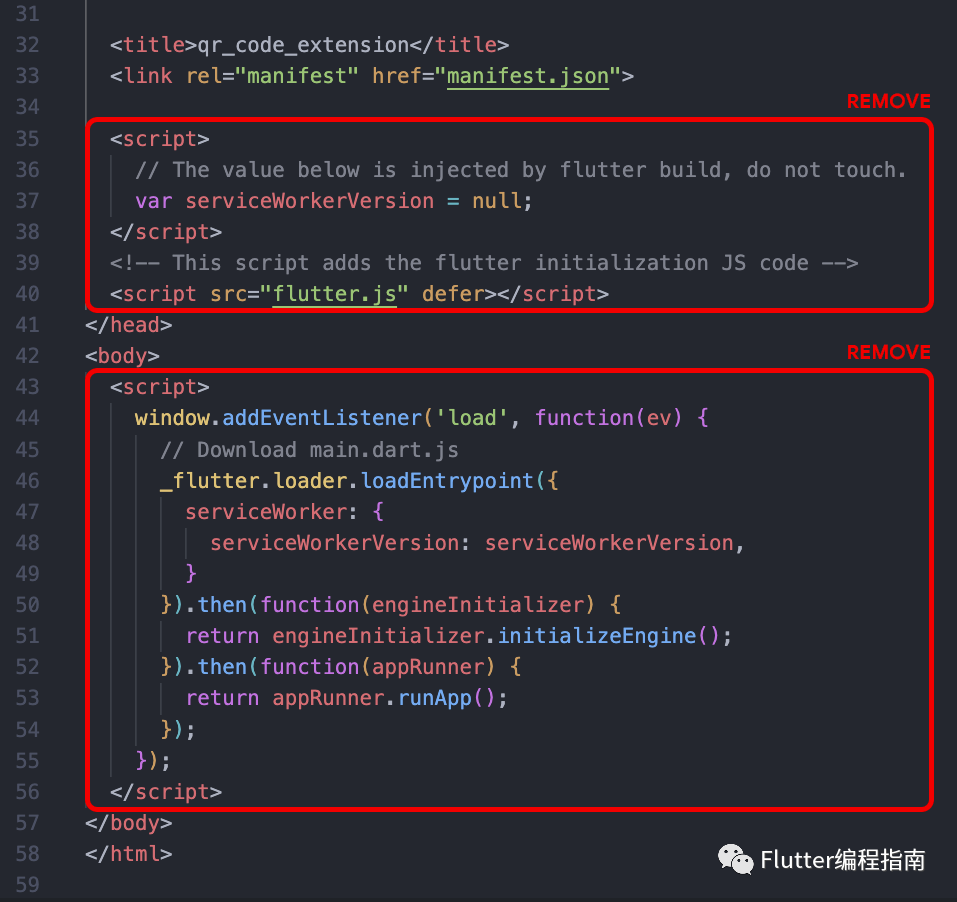
然后只在 <body> 中插入以下<script>标签:
<script src="main.dart.js" type="application/javascript"></script>
2、设置扩展程序尺寸
扩展程序具有固定的尺寸,因此您需要在 HTML 中明确指定扩展视图的宽度和高度值。
只需将起始 <html> 标记替换为以下内容:
<html style="height: 600px; width: 350px">
这会将扩展视图的高度和宽度分别设置为 600 像素和 350 像素。
3、在 manifest.json 中进行一些更改
导航到 web/manifest.json 文件并将整个内容替换为以下内容:
{
"name": "QR Code Extension",
"description": "QR Code Extension",
"version": "1.0.0",
"content_security_policy": {
"extension_pages": "script-src 'self' ; object-src 'self'"
},
"action": {
"default_popup": "index.html",
"default_icon": "icons/Icon-192.png"
},
"manifest_version": 3
}
构建扩展程序
完成所需的更改后,您就可以将其作为 Chrome 扩展程序构建和运行了。
默认情况下,当您使用以下命令运行 Flutter Web 构建时:
flutter build web
它为移动浏览器使用 HTML 渲染器,为桌面浏览器使用 CanvasKit 渲染器。
为了提供一点上下文,Flutter web 支持两种类型的渲染器(参考文档: https://docs.flutter.dev/development/platform-integration/web/renderers):
HTML 渲染器
使用 HTML 元素、CSS、Canvas 元素和 SVG 元素的组合。此渲染器具有较小的下载大小。
CanvasKit 渲染器
此渲染器具有更快的性能和更高的小部件密度(支持像素级别的操作),但下载大小增加了约 2MB。
但是为了将其用作扩展,您必须仅使用 HTML 渲染器专门生成构建。可以使用以下命令完成:
flutter build web --web-renderer html
暂时不要运行该命令!
最后,您必须使用 --csp 标志来禁用在生成的输出中动态生成代码,这是满足 CSP 限制所必需的。
运行此命令:
flutter build web --web-renderer html --csp
您将在 Flutter 项目根目录中的 build/web 文件夹中找到生成的文件。
扩展程序运行
要安装和使用此扩展程序,请在 Chrome 浏览器打开以下 URL:
chrome://extensions
此页面列出了所有 Chrome 扩展程序(如果您已有安装的扩展程序)。
启用网页右上角的开发者模式切换。
单击「加载已解压的扩展程序」。
选择 /build/web 文件夹。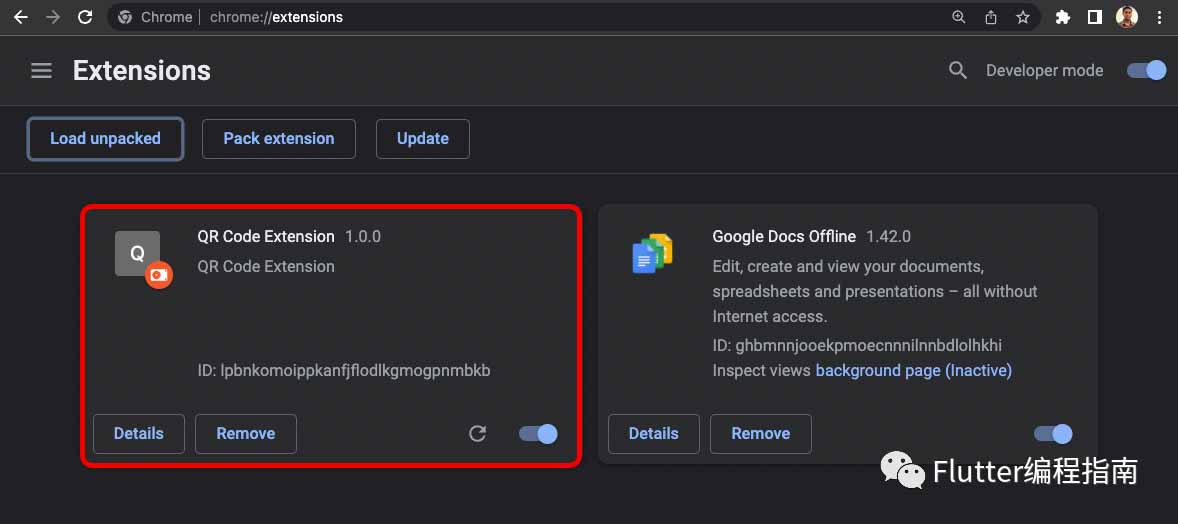
您将看到新的扩展程序现已添加到该页面。
该扩展程序将自动安装,您可以像任何常规扩展程序一样通过单击顶部栏中的扩展程序图标来访问它(也可以固定它以便于访问)。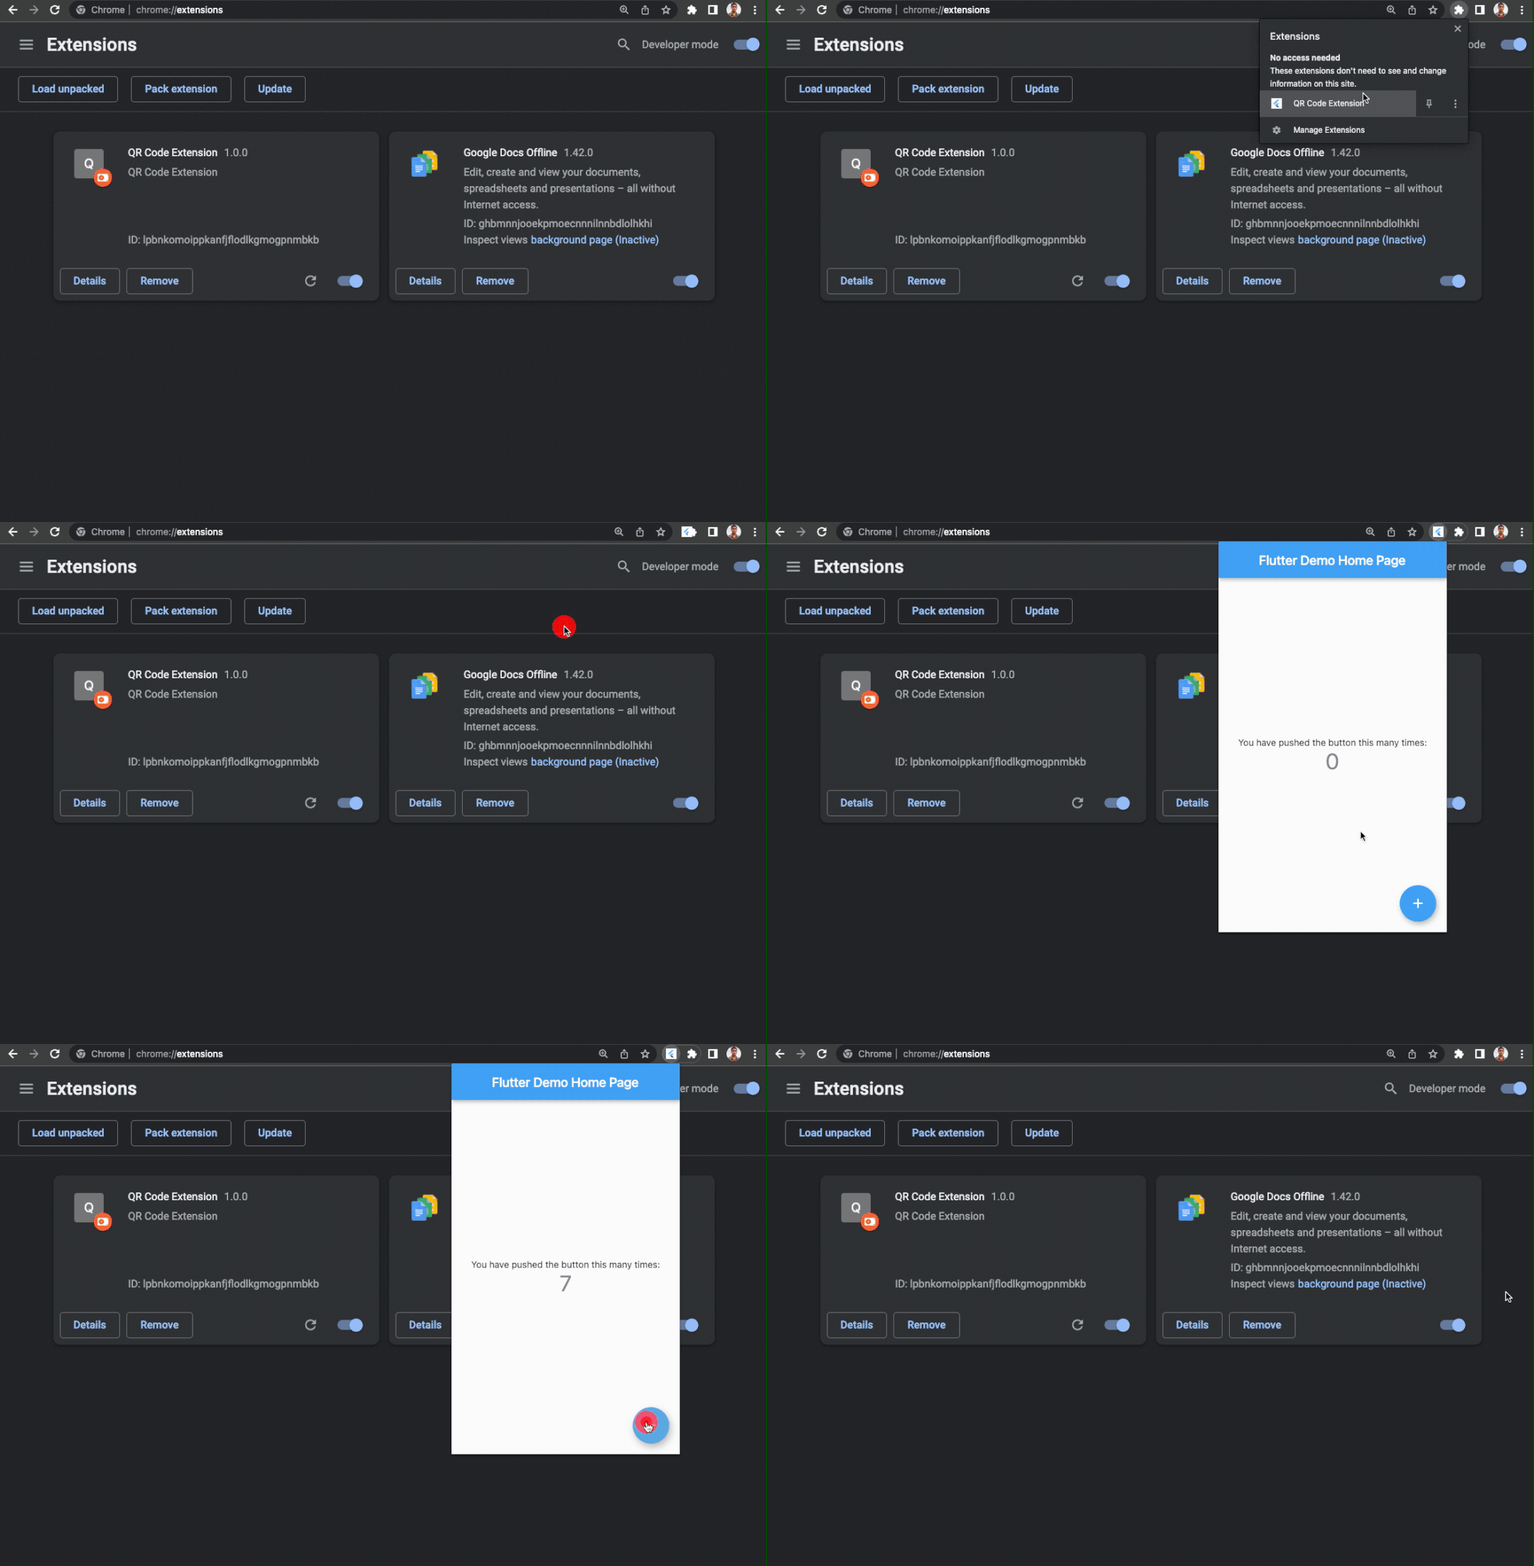
QR码生成扩展程序实践
现在让我们进入一个实际的实现,并使用 Flutter 构建 QR 码生成器扩展程序。
首先,转到 lib 目录中的 main.dart 文件。将该页面的全部内容替换为以下内容:
import 'package:flutter/material.dart';
import 'qr_view.dart';
void main() => runApp(const MyApp());
class MyApp extends StatelessWidget {
const MyApp({Key? key}) : super(key: key);
@override
Widget build(BuildContext context) {
return MaterialApp(
title: 'Flutter Chrome Extension',
debugShowCheckedModeBanner: false,
theme: ThemeData(
primarySwatch: Colors.blue,
),
home: const QRView(),
);
}
}
这只是为了简化应用程序的起点,并删除与演示计数器应用程序相关的代码。
接下来,在名为 qr_view.dart 的 lib 文件夹中创建一个新文件。在这个文件中,我们将添加用于构建 QR 码扩展 UI 的代码和一些用于根据 TextField 中存在的文本生成 QR 码的逻辑。
为了在 UI 中呈现 QR 码,我们将使用名为 qr_flutter 的 Flutter 包。从 Flutter 根目录运行以下命令来安装这个包:
flutter pub add qr_flutter
添加如下代码到qr_view.dart文件:
import 'package:flutter/material.dart';
import 'package:qr_flutter/qr_flutter.dart';
class QRView extends StatefulWidget {
const QRView({Key? key}) : super(key: key);
@override
State<QRView> createState() => _QRViewState();
}
class _QRViewState extends State<QRView> {
late final TextEditingController _textController;
late final FocusNode _textFocus;
String qrText = '';
int qrColorIndex = 0;
int qrBackgroundColorIndex = 0;
@override
void initState() {
_textController = TextEditingController(text: qrText);
_textFocus = FocusNode();
super.initState();
}
@override
Widget build(BuildContext context) {
// TODO: Add the UI code here
return Scaffold();
}
}
在上面的代码中,我们导入了 qr_flutter 包,并为 TextField 小部件初始化了一些变量,并用于访问当前选择的 QR 码背景和前景色。
现在,在 lib 目录中创建另一个名为 color_list.dart 的文件,并添加颜色列表以显示为 QR 码背景和前景色选择。
import 'package:flutter/material.dart';
const List<Color> qrBackgroundColors = [
Colors.white,
Colors.orange,
Colors.blueGrey,
Colors.red,
Colors.greenAccent,
];
const List<Color> qrColors = [
Colors.black,
Colors.purple,
Colors.white,
Colors.green,
Colors.blue,
];
最后,完成扩展的用户界面。
这是 QRView 小部件的完整代码以及扩展的 UI:
import 'package:flutter/material.dart';
import 'package:qr_flutter/qr_flutter.dart';
import 'color_list.dart';
class QRView extends StatefulWidget {
const QRView({Key? key}) : super(key: key);
@override
State<QRView> createState() => _QRViewState();
}
class _QRViewState extends State<QRView> {
late final TextEditingController _textController;
late final FocusNode _textFocus;
String qrText = '';
int qrColorIndex = 0;
int qrBackgroundColorIndex = 0;
@override
void initState() {
_textController = TextEditingController(text: qrText);
_textFocus = FocusNode();
super.initState();
}
@override
Widget build(BuildContext context) {
return Scaffold(
backgroundColor: Colors.white,
body: Padding(
padding: const EdgeInsets.symmetric(
horizontal: 16.0,
vertical: 24.0,
),
child: Row(
crossAxisAlignment: CrossAxisAlignment.start,
children: [
ClipRRect(
borderRadius: BorderRadius.circular(16),
child: QrImage(
data: qrText,
padding: const EdgeInsets.all(16),
backgroundColor: qrBackgroundColors[qrBackgroundColorIndex],
foregroundColor: qrColors[qrColorIndex],
),
),
Expanded(
child: Padding(
padding: const EdgeInsets.symmetric(
horizontal: 24.0,
vertical: 16,
),
child: Column(
crossAxisAlignment: CrossAxisAlignment.start,
mainAxisSize: MainAxisSize.min,
children: [
TextField(
controller: _textController,
focusNode: _textFocus,
decoration: InputDecoration(
labelText: 'QR Text',
labelStyle: const TextStyle(
color: Color(0xFF80919F),
),
hintText: 'Enter text / URL',
hintStyle: const TextStyle(
color: Color(0xFF80919F),
),
enabledBorder: OutlineInputBorder(
borderSide: const BorderSide(
color: Colors.black54,
width: 2,
),
borderRadius: BorderRadius.circular(16),
),
focusedBorder: OutlineInputBorder(
borderSide: const BorderSide(
color: Colors.black,
width: 2,
),
borderRadius: BorderRadius.circular(16),
),
),
onChanged: (value) => setState(() {
qrText = value;
}),
),
const SizedBox(height: 24),
const Text(
'Choose QR Color',
style: TextStyle(
color: Colors.black,
fontSize: 16,
),
),
Expanded(
child: ListView.separated(
shrinkWrap: true,
scrollDirection: Axis.horizontal,
separatorBuilder: (_, __) => const SizedBox(width: 8),
itemCount: qrColors.length,
itemBuilder: (context, index) {
return InkWell(
hoverColor: Colors.transparent,
splashColor: Colors.transparent,
highlightColor: Colors.transparent,
onTap: () => setState(() {
qrColorIndex = index;
}),
child: Stack(
alignment: Alignment.center,
children: [
CircleAvatar(
radius: qrColorIndex == index ? 23 : 22,
backgroundColor: qrColorIndex == index
? Colors.black
: Colors.black26,
),
CircleAvatar(
radius: 20,
backgroundColor: qrColors[index],
),
],
),
);
},
),
),
const Text(
'Choose QR Background Color',
style: TextStyle(
color: Colors.black,
fontSize: 16,
),
),
Expanded(
child: ListView.separated(
shrinkWrap: true,
scrollDirection: Axis.horizontal,
separatorBuilder: (_, __) => const SizedBox(width: 8),
itemCount: qrBackgroundColors.length,
itemBuilder: (context, index) {
return InkWell(
hoverColor: Colors.transparent,
splashColor: Colors.transparent,
highlightColor: Colors.transparent,
onTap: () => setState(() {
qrBackgroundColorIndex = index;
}),
child: Stack(
alignment: Alignment.center,
children: [
CircleAvatar(
radius:
qrBackgroundColorIndex == index ? 23 : 22,
backgroundColor:
qrBackgroundColorIndex == index
? Colors.black
: Colors.black26,
),
CircleAvatar(
radius: 20,
backgroundColor: qrBackgroundColors[index],
),
],
),
);
},
),
),
const SizedBox(height: 16),
],
),
),
)
],
),
),
);
}
}
转到 web/index.html 文件,并将起始 标记内定义的尺寸更改为以下内容:
<html style="height: 350px; width: 650px">
扩展程序的视图尺寸必须明确定义,上述尺寸应正确适应扩展 UI。
至此,您已成功创建 QR 码生成器扩展。运行相同的 flutter build 命令来重新生成 Flutter web 文件:
flutter build web --web-renderer html --csp
按照我们之前讨论的相同步骤安装扩展。
哇喔!您的 QR 码生成器扩展程序已准备好使用。🎉
局限性
尽管看起来令人兴奋,但也存在一定的局限性。
以下是我在探索如何使用 Flutter 构建 chrome 扩展时遇到的一些限制(其中一些可能是可以修复的,这需要更多的探索)。
1. 仅限于 HTML 渲染器
另一个让 QR 码生成器扩展更酷的附加功能是添加了“另存为图像”按钮。使用它,您可以将生成的二维码保存为普通图像文件。
但不幸的是,由于扩展不支持 CanvasKit 渲染器,因此您不能在任何 RenderRepaintBoundary 对象上使用 toImage() 方法(这是将任何 Flutter 小部件转换为图像格式所必需的)。
2. 无法使用 Firebase(应该可以)
如果您还记得,最初我们修改了 index.html 文件以删除大部分 <script> 标记。这是为了满足内容安全策略 (CSP) 规则。Manifest V3 不支持第三方 URL 的内联执行。
但是我尝试运行一个较旧的项目,该项目不使用 Flutter 中的 Firebase 的仅 Dart 初始化(很可能应该解决它,因为在这种情况下您不需要在 <script> 标记内定义 Firebase 插件 )。
3. 小部件状态丢失
这可能不被视为限制,而只是您在使用 Flutter 构建扩展时应牢记的一点。每当您在扩展视图之外单击以将其关闭时,您的所有应用程序状态都会丢失。
您应该使用 Flutter 插件在本地存储状态,例如 shared_preferences 插件(它工作正常,我已经在扩展中测试过它)。
最后,QR 码生成器 Chrome 扩展的 GitHub 代码仓库可在以下链接中找到:
https://github.com/sbis04/flutter_qr_extension
参考
Chrome 扩展文档:https://developer.chrome.com/docs/extensions/
Flutter Web 文档:https://docs.flutter.dev/get-started/web
Flutter Web 渲染器:https://docs.flutter.dev/development/platform-integration/web/renderers
原文:https://medium.com/flutter-community/building-a-chrome-extension-using-flutter-aeb100a6d6c
欢迎关注微信公众号 :前端开发爱好者
添加好友备注【进阶学习】拉你进技术交流群



 个人中心
个人中心 退出
退出


 分类导航
分类导航