

 个人中心
个人中心 退出
退出


小白一看就会的Spring的RestTemplate的使用
写在前面
您好,我是码农飞哥,感谢您阅读此文。作为一名Java开发者,我们怎么都绕不开调用外部接口的场景,调用的方式要么是通过Http协议来调用,要么是通过RPC协议来调用,通过Http协议调用的话我们就需要用到Http的Api。比较常用的有Apache的HttpClient和原生的HttpURLConnection。这些Api都比较好用,但是我们今天要介绍一种更加好用API,Spring自带的RestTemplate,能力更强,使用更方便。
目录
    写在前面
    怎么用?
        SpringBoot项目
        设置超时时间
    GET请求
        返回业务对象类getForObject方法
    POST 请求
    postForLocation
    exchange 方法的使用
    总结
怎么用?
SpringBoot项目
SpringBoot项目中,只需要引入spring-boot-starter-web依赖就可以了,其实spring-boot-starter-web依赖也是SpringBoot项目必备的一个依赖。
<dependency>
			<groupId>org.springframework.boot</groupId>
			<artifactId>spring-boot-starter-web</artifactId>
		</dependency>
设置超时时间
引入依赖之后,就来开始使用吧,任何一个Http的Api我们都可以设置请求的连接超时时间,请求超时时间,如果不设置的话,就可能会导致连接得不到释放,造成内存溢出。这个是我们需要重点注意的点,下面就来看看RestTemplate如何来设置超时时间呢?我们可以在SimpleClientHttpRequestFactory类中设置这两个时间,然后将factory传给RestTemplate实例,设置如下:
@Configuration
public class RestTemplateConfig {
/**
* 服务器返回数据(response)的时间
/
private static final Integer READ_TIME_OUT = 6000;
/*
* 连接上服务器(握手成功)的时间
*/
private static final Integer CONNECT_TIME_OUT = 6000;
@Bean
public RestTemplate restTemplate(){
    ClientHttpRequestFactory requestFactory = new HttpComponentsClientHttpRequestFactory(httpClient());
    return new RestTemplate(requestFactory);
}

@Bean
public HttpClient httpClient(){
   //默认证书有效
    SSLConnectionSocketFactory sslConnectionSocketFactory = SSLConnectionSocketFactory.getSocketFactory();
    SSLContext sslContext = null;
    try {
        //信任所有的SSL证书
        sslContext = SSLContextBuilder.create().setProtocol(SSLConnectionSocketFactory.SSL)
                .loadTrustMaterial((x, y) -> true).build();
    } catch (Exception e) {
        e.printStackTrace();
    }
    if (sslContext != null) {
        sslConnectionSocketFactory = new SSLConnectionSocketFactory(sslContext);
    }
    // 支持HTTP、HTTPS
    Registry<ConnectionSocketFactory> registry = RegistryBuilder.<ConnectionSocketFactory>create()
            .register("http", PlainConnectionSocketFactory.getSocketFactory())
            .register("https", sslConnectionSocketFactory)
            .build();
    PoolingHttpClientConnectionManager connectionManager = new PoolingHttpClientConnectionManager(registry);
    connectionManager.setMaxTotal(200);
    connectionManager.setDefaultMaxPerRoute(100);
    connectionManager.setValidateAfterInactivity(2000);
    RequestConfig requestConfig = RequestConfig.custom()
            // 服务器返回数据(response)的时间,超时抛出read timeout
            .setSocketTimeout(READ_TIME_OUT)
            // 连接上服务器(握手成功)的时间,超时抛出connect timeout
            .setConnectTimeout(CONNECT_TIME_OUT)
            // 从连接池中获取连接的超时时间,超时抛出ConnectionPoolTimeoutException
            .setConnectionRequestTimeout(1000)
            .build();
    return HttpClientBuilder.create().setDefaultRequestConfig(requestConfig).setConnectionManager(connectionManager).build();
}
}
说完了RestTemplate的相关设置,下面就来看看平时我们用的最多两种请求方法:get方法和post方法吧。
GET请求
RestTemplate中提供的get请求的方法主要分为两类,一类是只返回请求体,一类是返回ResponseEntity对象,这个对象主要是包装了Http请求的响应状态status,响应头headers,和响应体body。后面我们会详细介绍。首先来看看getForObject方法。
返回业务对象类getForObject方法
getForObject方法的重载方法有如下三个:
/**
方法一,直接将参数添加到url上面。
* Retrieve a representation by doing a GET on the specified URL.
* The response (if any) is converted and returned.
*
URI Template variables are expanded using the given URI variables, if any.
* @param url the URL 请求地址
* @param responseType the type of the return value 响应体的类型
* @param uriVariables the variables to expand the template 传入的参数
* @return the converted object
/
@Nullable
T getForObject(String url, Class responseType, Object… uriVariables) throws RestClientException;
/*
方法二,通过Map来提交参数。
* Retrieve a representation by doing a GET on the URI template.
* The response (if any) is converted and returned.
*
URI Template variables are expanded using the given map.
* @param url the URL
* @param responseType the type of the return value
* @param uriVariables the map containing variables for the URI template
* @return the converted object
*/
@Nullable
T getForObject(String url, Class responseType, Map<String, ?> uriVariables) throws RestClientException;
/**
   方法三,用URI来请求。
 * Retrieve a representation by doing a GET on the URL .
 * The response (if any) is converted and returned.
 * @param url the URL
 * @param responseType the type of the return value
 * @return the converted object
 */
@Nullable
<T> T getForObject(URI url, Class<T> responseType) throws RestClientException;
下面定义了一个接口,用来测试上面三个方法的使用,这个接口有两个参数,分别是userId和userName。
根据传入的userId和userName来查询用户,如果可以查询的到的话,则返回查询到的用户,如果查询不到的话,则返回找不到数据。
响应体是JSON格式的。
/**
* get请求获取用户
*
* @param userName 用户名
* @param userId 用户id
* @return
*/
@ResponseBody
@RequestMapping(value = “/getUser.do”)
public ResultData getUserByName(
@RequestParam(name = “userId”,required = false) Integer userId,
@RequestParam(name = “userName”,required = false) String userName) {
if (StringUtils.isAnyBlank(userName)) {
return new ResultData<>(HttpStatus.BAD_REQUEST.value(), null, “参数不能为空”);
}
List userList = new ArrayList<>();
for (int i = 1; i <= 2; i++) {
User user = new User();
user.setUserId(i);
user.setUserName(“张三” + i);
user.setAge(20 + i);
userList.add(user);
}
for (User user : userList) {
if (userName.equals(user.getUserName()) && userId.equals(user.getUserId())) {
return new ResultData(HttpStatus.OK.value(), user, “成功”);
}
}
return new ResultData<>(HttpStatus.INTERNAL_SERVER_ERROR.value(), null, “找不到数据”);
}
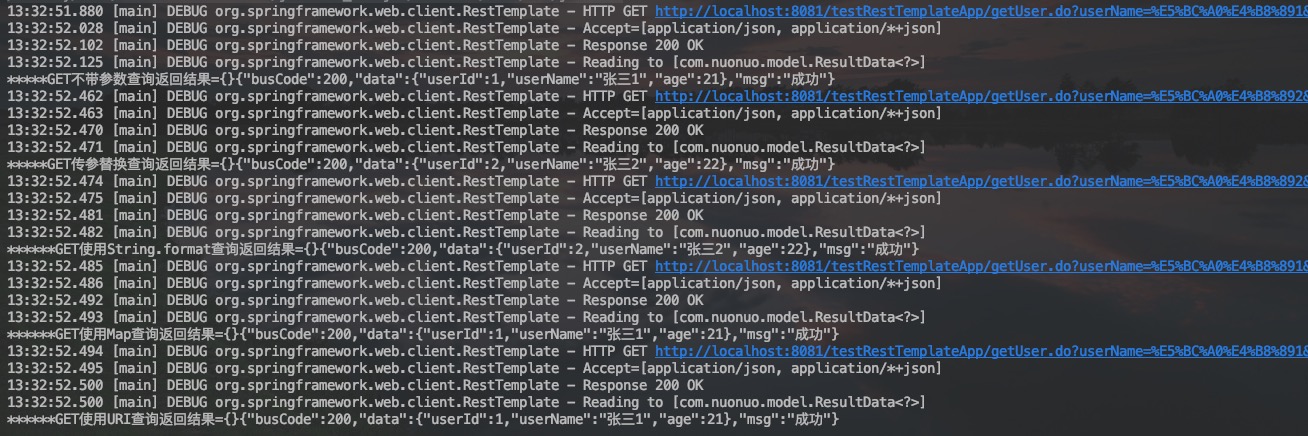
下面我们就分别用那三个方法请求/getUser.do接口进行测试:
@Test
public void getForObjectTest() {
String baseUrl = “http://localhost:8081/testRestTemplateApp/getUser.do”;
//方法一: 直接拼接参数,推荐使用
String url =baseUrl+"?userName=张三1&userId=1";
ResultData resultData = restTemplate.getForObject(url, ResultData.class);
System.out.println("*****GET直接拼接参数查询返回结果={}" + JSON.toJSONString(resultData));
//方法一:传参替换,推荐使用
url = baseUrl+"?userName={?}&userId={?}";
resultData = restTemplate.getForObject(url, ResultData.class, “张三2”,2);
System.out.println("*****GET传参替换查询返回结果={}" + JSON.toJSONString(resultData));
//方法一:传参替换,使用String.format,推荐使用
url = baseUrl + String.format("?userName=%s&userId=%s", “张三2”,2);
resultData = restTemplate.getForObject(url, ResultData.class);
System.out.println("******GET使用String.format查询返回结果={}" + JSON.toJSONString(resultData));
//方法二:使用Map,不推荐使用
url = baseUrl + “?userName={userName}&userId={userId}”;
Map<String, Object> paramMap = new HashMap<>();
paramMap.put(“userName”, “张三1”);
paramMap.put(“userId”,1);
resultData = restTemplate.getForObject(url, ResultData.class, paramMap);
System.out.println("******GET使用Map查询返回结果={}" + JSON.toJSONString(resultData));
//方法三:使用URI,不推荐使用
URI uri = URI.create(baseUrl+"?userName=%E5%BC%A0%E4%B8%891&userId=1");
ResultData resultData1 = restTemplate.getForObject(uri, ResultData.class);
System.out.println("******GET使用URI查询返回结果={}" + JSON.toJSONString(resultData1));
}
运行结果如下:
需要注意的是:
传参替换使用{?}来表示坑位,根据实际的传参顺序来填充,如下:
url = baseUrl+"?userName={?}&userId={?}";
resultData = restTemplate.getForObject(url, ResultData.class, “张三2”,2);
使用{xx}来传递参数时,这个xx对应的就是map中的key

   url = baseUrl + "?userName={userName}&userId={userId}";
    Map<String, Object> paramMap = new HashMap<>();
    paramMap.put("userName", "张三1");
    paramMap.put("userId",1);


当响应头是application/json;charset=UTF-8格式的时候,返回的数据类型可以直接写String.class,如下

    String url ="http://localhost:8081/testRestTemplateApp/getUser.do?userName=张三1&userId=1";
    String resultData = restTemplate.getForObject(url, String.class);


不推荐直接使用方法三传入URI,原因主要有如下两点: 1. 传入的参数包含中文时必须要转码,直接传中文会报400的错误,2. 响应的结果必须要跟接口的返回值保持一致,不然回报406的错误。

  //userName不能直接传入张三1,不然会报400的错误
   URI uri = URI.create(baseUrl+"?userName=%E5%BC%A0%E4%B8%891&userId=1");
   //responseType不能传入String.class,不然会报406的错误
    ResultData resultData1 = restTemplate.getForObject(uri, ResultData.class);
说完了getForObject,下面来看看getForEntity的方法,这三个方法跟上面的getForObject三个方法分别对应,只是返回值不同。
<T> ResponseEntity<T> getForEntity(String url, Class<T> responseType, Object... uriVariables)
		throws RestClientException;

<T> ResponseEntity<T> getForEntity(String url, Class<T> responseType, Map<String, ?> uriVariables)
		throws RestClientException;

<T> ResponseEntity<T> getForEntity(URI url, Class<T> responseType) throws RestClientException;
这里只列举一个参数拼接的方式来举例说明:
String baseUrl = “http://localhost:8081/testRestTemplateApp/getUser.do”;
//参数拼接的方式
String url =baseUrl+"?userName=张三1&userId=1";
ResponseEntity entity = restTemplate.getForEntity(url, ResultData.class);
System.out.println("*****参数拼接查询返回结果={}" + JSON.toJSONString(entity));
运行后的结果如下:有响应头heads,有响应体body,有响应状态statusCodeValue等。
{“body”:{“busCode”:200,“data”:{“userId”:1,“userName”:“张三1”,“age”:21},“msg”:“成功”},“headers”:{“Content-Type”:[“application/json;charset=UTF-8”],“Transfer-Encoding”:[“chunked”],“Date”:[“Fri, 06 Mar 2020 05:42:08 GMT”],“Keep-Alive”:[“timeout=60”],“Connection”:[“keep-alive”]},“statusCode”:“OK”,“statusCodeValue”:200}
POST 请求
说完了get请求相关的方法之后,接下来我们来看看post请求相关的方法,首先还是来看postForObject的三个重载方法。
/**
 * @param url the URL   请求地址
 * @param request the Object to be POSTed (may be {@code null})  请求体,可以传入一个Bean对象,也可以传入HttpEntity对象,包装请求头
 * @param responseType the type of the return value  响应对象的类型
 * @param uriVariables the variables to expand the template 传入的参数
 * @return the converted object
 * @see HttpEntity
 */
@Nullable
<T> T postForObject(String url, @Nullable Object request, Class<T> responseType,
		Object... uriVariables) throws RestClientException;
/**
* @param url the URL 请求地址
* @param request the Object to be POSTed (may be {@code null}) 请求体,可以传入一个Bean对象,也可以传入HttpEntity对象,包装请求头
* @param responseType the type of the return value 响应对象的类型
* @param uriVariables the variables to expand the template 传入的map
* @return the converted object
* @see HttpEntity
*/
@Nullable
T postForObject(String url, @Nullable Object request, Class responseType,
Map<String, ?> uriVariables) throws RestClientException;
/**
 * @param url the URL
 * @param request the Object to be POSTed (may be {@code null})
 * @param responseType the type of the return value
 * @return the converted object
 * @see HttpEntity
 */
@Nullable
<T> T postForObject(URI url, @Nullable Object request, Class<T> responseType) throws RestClientException;
还是用上面的/getUser.do接口进行测试。
@Test
public void testPostForObjectForForm() {
    String baseUrl = "http://localhost:8081/testRestTemplateApp/getUser.do";

    //方法一:表单提交
    MultiValueMap<String, Object> request = new LinkedMultiValueMap<>();
    request.set("userName","张三1");
    request.set("userId",1);
    ResultData resultData = restTemplate.postForObject(baseUrl,request, ResultData.class);
    System.out.println("*****POST表单提交使用URI查询返回结果={}" + JSON.toJSONString(resultData));
    //方法二:使用URI
    URI uri = URI.create(baseUrl);
    resultData = restTemplate.postForObject(uri,request, ResultData.class);
    System.out.println("******POST使用URI查询返回结果={}" + JSON.toJSONString(resultData));
}
运行结果如下:
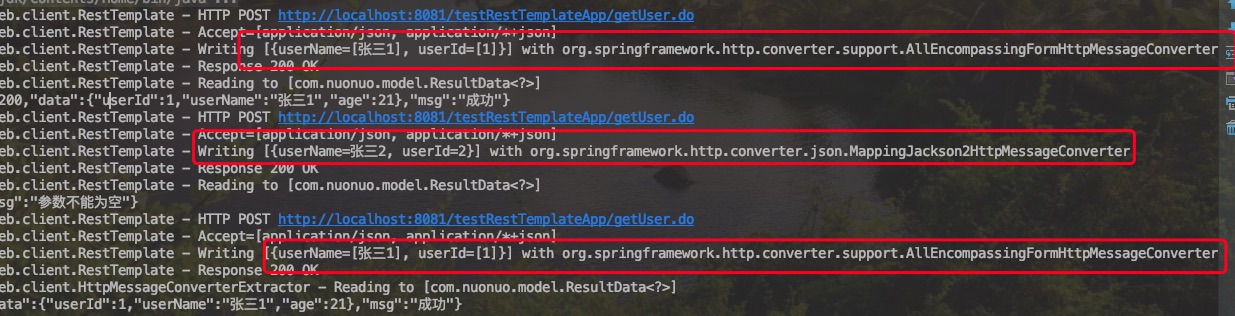
从运行结果我们可以看出,
如果传入的参数是MultiValueMap类型的对象是,Spring会通过AllEncompassingFormHttpMessageConverter转换器来将参数通过表单提交。
如果直接传入一个Map对象,则会通过MappingJackson2HttpMessageConverter转换器对参数进行转换。
说完了表单提交,下面我们看看另外一种场景,如下,这个接口是一个保存用户数据的接口,参数需要格式化后放在请求体中。
@ResponseBody
@PostMapping("/addUserJSON.do")
public ResultData<Boolean> addUserJSON(@RequestBody User user) {
    if (user == null) {
        return new ResultData<>(HttpStatus.BAD_REQUEST.value(), null, "参数不能为空");
    }
    return new ResultData<>(HttpStatus.OK.value(),true,"保存成功");
}
当我们需要调用接口是通过@RequestBody来接受参数时,也就是需要传入一个JSON对象,我们该如何请求呢?我们调用可以postForObject可以直接传入User对象, 也可以将请求头设置成application/json,然后将User对象序列化,代码如下所示:
@Test
public void testPostForObject() {
    String baseUrl = "http://localhost:8081/testRestTemplateApp/addUserJSON.do";
    User user = new User();
    user.setUserName("李四");
    user.setAge(23);
    //第一种方式:不传入JSON的参数,不设置请求头
    ResultData resultData = restTemplate.postForObject(baseUrl, user, ResultData.class);
    System.out.println("*********不序列化传入参数请求结果={}" + JSON.toJSONString(resultData));
    //第二种方式:传入JSON类型的参数,设置请求头
    HttpHeaders headers = new HttpHeaders();
    headers.setContentType(MediaType.APPLICATION_JSON);
    HttpEntity httpEntity = new HttpEntity(JSON.toJSONString(user),headers);
    resultData = restTemplate.postForObject(baseUrl, httpEntity, ResultData.class);
    System.out.println("*********序列化参数请求结果={}" + JSON.toJSONString(resultData));
}
第一种方式是由于Spring内部的MappingJackson2HttpMessageConverter会将参数进行序列化并请求接口
第二种方式是直接设置好请求头为application/json,并将参数序列化。所以就不需要通过MappingJackson2HttpMessageConverter进行转换。比较推荐
运行结果如下:

postForEntity方法在此就不在赘述了。
说完了,get请求的相关方法和post请求的相关方法,接下来我们来看看另外一类方法
postForLocation
postForLocation的定义是POST 数据到一个URL,返回新创建资源的URL,就是重定向或者页面跳转。
同样提供了三个方法,分别如下,需要注意的是返回结果为URI对象,即网络资源
public URI postForLocation(String url, @Nullable Object request, Object… uriVariables)
throws RestClientException ;
public URI postForLocation(String url, @Nullable Object request, Map<String, ?> uriVariables)
throws RestClientException ;
public URI postForLocation(URI url, @Nullable Object request) throws RestClientException ;
这类接口主要应用在需要跳转页面的请求,比如,登录,注册,支付等post请求,请求成功之后需要跳转到成功的页面。这种场景下我们可以使用postForLocation了,提交数据,并获取放回的URI,一个测试如下:
首先mock一个接口
@ResponseBody
@RequestMapping(path = "loginSuccess")
public String loginSuccess(String userName, String password) {
    return "welcome " + userName;
}

/**
 * @param userName
 * @param password
 * @return
 */
@RequestMapping(path = "login", method = {RequestMethod.GET, RequestMethod.OPTIONS, RequestMethod.POST}
        ,produces = "charset/utf8")
public String login(@RequestParam(value = "userName", required = false) String userName,
                   @RequestParam(value = "password", required = false) String password) {
    return "redirect:/loginSuccess?userName=" + userName + "&password=" + password + "&status=success";
}
测试请求是:
@Test
public void testPostLocation() {
    String url = "http://localhost:8081/testRestTemplateApp/login";
    MultiValueMap<String, String> paramMap = new LinkedMultiValueMap<>();
    paramMap.add("userName", "bob");
    paramMap.add("password", "1212");
    URI location = restTemplate.postForLocation(url, paramMap);
    System.out.println("*******返回的数据=" + location);
}
运行结果如下:

exchange 方法的使用
前面详细介绍了getForObject和postForObject这两个常用的方法,现在再介绍一个更通用的方法exchange方法,其实getForObject和postForObject方法内部也是调用的exchange方法。该方法的特点是ResponseEntity对象,该对象包括了整个响应体,包括status,heads等等。下面展示其使用
public T toPostEntity(String url, HttpEntity httpEntity, Class responseType) {
ResponseEntity responseEntity = restTemplate.exchange(url, HttpMethod.POST, httpEntity, responseType);
logger.info(“请求地址是={},响应结果是={}”, url, new Gson().toJson(responseEntity));
//接受请求失败,抛出异常
if (HttpStatus.OK.value() != responseEntity.getStatusCodeValue() || responseEntity.getStatusCode().isError()) {
throw new BusinessException(ErrorCode.RESULT_CODE_ERROR);
}
//接受请求成功
return responseEntity.getBody();
}
需要注意的是当请求体的contentType与响应体的contentType不相同是,传入的responseType需要指定为String.class。不然,可能会报如下错误。
Could not extract response: no suitable HttpMessageConverter found for response type [class java.lang.Object] and content type [text/html;charset=utf-8]
调用示例
HttpHeaders headers = new HttpHeaders();
headers.setContentType(MediaType.APPLICATION_JSON);
Map<String, Object> paramMap = new HashMap<>();
paramMap.put(“areaName”, “安徽省”);
HttpEntity httpEntity = new HttpEntity(paramMap, headers);
requestHandler.toPostEntity(“http://localhost:8080/v1/data/push”, httpEntity, String.class);
调用结果是:
响应结果是={“status”:200,“headers”:{“Aiedu-Time”:[“1616722693”],“Content-Type”:[“application/json;charset\u003dUTF-8”],“Transfer-Encoding”:[“chunked”],“Date”:[“Fri, 26 Mar 2021 01:38:13 GMT”]},“body”:"{“code”:0,“msg”:“请求成功”,“data”:null}"}
介绍完了restTemplate的常用方法,但是,我们或许会感觉到restTemplate的方法太多了,调用起来不太方便,为了使用方便,我们就对restTemplate做一个封装。代码如下所示:主要封装成了四个方法,一个是通过get请求的方法,一个是通过表单提交的post请求方法,一个是通过json提交的post请求方法,最后就是上传图片的方法。
@Component
public class RestTemplateProxy {
@Autowired
private RestTemplate restTemplate;
/**
 *
 * @param url 请求地址
 *        参数可以通过 http://localhost:8888/juheServer/juhe/info/queryCustomer.do?taxNo=92330424MA29G7GY5W
 *            或者 http://localhost:8888/juheServer/juhe/info/queryCustomer.do+String.format("?taxNo=%s&order=%s", "92330424MA29G7GY5W","1212121212");
 * @param responseType 返回值的类型
 * @return
 * @author xiagwei
 * @date 2020/3/5 5:28 PM
 *
 */
public <T> T getForObject(String url, Class<T> responseType) {
    return restTemplate.getForObject(url, responseType);
}

/**
 * 通过json的方式请求服务,不需要将数据格式化,直接将请求对象传入即可
 * 可以是map,可以是一个bean
 * @param url 请求接口
 * @param requestParam 请求实体
 * @param responseType 返回对象的clazz
 * @return
 * @author xiagwei
 * @date 2020/3/5 5:36 PM
 */
public <T> T postForObjectJSON(String url, Object requestParam,Class<T> responseType) {
    HttpHeaders headers = new HttpHeaders();
    headers.setContentType(MediaType.APPLICATION_JSON);
    HttpEntity httpEntity = new HttpEntity(requestParam, headers);
    return restTemplate.postForObject(url, httpEntity, responseType);
}

/**
 * 通过Form表单的方式提交
 * @param url 请求接口
 * @param requestParam 请求实体,可以是一个实体,也可以一个map
 * @param responseType 返回对象的clazz
 * @return
 * @author xiagwei
 * @date 2020/3/5 5:42 PM
 */
public <T> T postForObjectForm(String url, @NotNull Object requestParam, Class<T> responseType) {
    MultiValueMap<String, Object> valueRequestMap = createValueMap(requestParam);
    return restTemplate.postForObject(url, valueRequestMap, responseType);
}

   /**
 * 最通用的请求方法
 *
 * @param url          请求的URL
 * @param requestParam 请求参数
 * @param headers      请求头
 * @param response     响应结果的类型
 * @return
 * @date 2021/3/10  14:21
 */
public <T> T postForEntityHeader(String url, Object requestParam, HttpHeaders headers, Class<T> response) {
    MultiValueMap<String, Object> requestEntity = createValueMap(requestParam);
    HttpEntity<MultiValueMap<String, Object>> httpEntity = new HttpEntity<>(requestEntity,headers);
    return restTemplate.postForObject(url, httpEntity, response);
}
/**
 * 图片上传
 *
 * @param url  请求地址
 * @param body 请求体
 *           MultiValueMap<String, Object> body = new LinkedMultiValueMap<>();
             body.add("uploadFile", new FileSystemResource(ImageUtil.downloadImgByUrl(url)));
 * @param responseType 返回结果的clazz对象
 * @return
 * @author xiagwei
 * @date 2020/3/5 6:05 PM
 */
public <T> T uploadImg(@NotNull String url, @NotNull  MultiValueMap<String, Object> body,Class<T> responseType) {
    HttpHeaders headers = new HttpHeaders();
    headers.setContentType(MediaType.MULTIPART_FORM_DATA);
    HttpEntity<MultiValueMap<String, Object>> requestEntity = new HttpEntity<>(body,headers);
    return restTemplate.postForObject(url,requestEntity,responseType);
}
 /**
 * 基础的请求方法
 *
 * @param url
 * @param httpEntity
 * @param responseType
 * @return
 * @Author weixiang
 * @date 2020/3/5 6:05 PM
 */
 public  <T> T toPostEntity(String url, HttpEntity httpEntity, Class<T> responseType) {
    ResponseEntity<T> responseEntity = restTemplate.exchange(url, HttpMethod.POST, httpEntity, responseType);
    logger.info("请求地址是={},响应结果是={}", url, new Gson().toJson(responseEntity));
    //接受请求失败,抛出异常
    if (HttpStatus.OK.value() != responseEntity.getStatusCodeValue() || responseEntity.getStatusCode().isError()) {
        throw new BusinessException(ErrorCode.RESULT_CODE_ERROR);
    }
	//接受请求成功
    return responseEntity.getBody();
}

private MultiValueMap createValueMap(Object requestParam) {
    MultiValueMap<String, Object> valueRequestMap = new LinkedMultiValueMap<>();
    Map<String, Object> param = null;
    if (requestParam instanceof Map) {
        param = (Map<String, Object>) requestParam;
    } else {
        param = BeanUtil.beanToMap(requestParam);
    }
    for (String key : param.keySet()) {
        valueRequestMap.add(key, param.get(key));
    }
    return valueRequestMap;
}
}
这里需要重点说下,图片上传的方法,上传图片的话,我们一定要把请求头设置成multipart/form-data,然后其余的参数通过MultiValueMap来设置。
public <T> T uploadImg(@NotNull String url, @NotNull  MultiValueMap<String, Object> body,Class<T> responseType) {
    HttpHeaders headers = new HttpHeaders();
    headers.setContentType(MediaType.MULTIPART_FORM_DATA);
    HttpEntity<MultiValueMap<String, Object>> requestEntity = new HttpEntity<>(body,headers);
    return restTemplate.postForObject(url,requestEntity,responseType);
}
总结
本文主要介绍了restTemplate类的使用,首先介绍了需要引入的依赖,然后介绍了如何设置超时时间,接着就是介绍了restTemplate中get请求相关的方法和post请求相关的方法,以及这些方法如何调用。最后就是对常用的请求方法做了一个封装。希望对读者朋友们有所帮助。
作者:码农飞哥
微信公众号:码农飞哥

 分类导航
分类导航