

 个人中心
个人中心 退出
退出


React + TypeScript 常用类型汇总
本文适合对TypeScript感兴趣的小伙伴阅读~
欢迎关注前端早茶,与广东靓仔携手共同进阶~
作者:广东靓仔
一、前言
在React项目开发中,写出优雅的、更有意义的typescript代码,是我们一直追求的。本文广东靓仔带小伙伴们一起来看看React项目实际开发中用到的一些常用类型示例。
目录抢先看:
基本prop类型示例
有用的 React Prop 类型示例
函数组件
类组件
form和event
Context
forwardRef/createRef
有用的hooks
HOC
Linting
二、基本prop类型示例
常规的程序中使用的 TypeScript 类型列表:
type AppProps = {
message: string;
count: number;
disabled: boolean;
/** 一个类型的数组!*/
names: string[];
/** 用于指定精确字符串值的字符串文字,使用联合类型将它们连接在一起 */
status: "waiting" | "success";
/** 任何对象,只要你不使用它的属性(不常见,但用作占位符)*/
obj: object;
obj2: {}; // 和 `object` 差不多,和 `Object` 完全一样
/** 具有任意数量属性的对象 (PREFERRED) */
obj3: {
id: string;
title: string;
};
/** 对象数组!(常见的) */
objArr: {
id: string;
title: string;
}[];
/** 具有任意数量的相同类型属性的 dict 对象 */
dict1: {
[key: string]: MyTypeHere;
};
dict2: Record<string, MyTypeHere>; // 相当于 dict1
/** 任何函数,只要你不调用它(不推荐) */
onSomething: Function;
/** 不接受或不返回任何内容的函数(非常常见) */
onClick: () => void;
/** 带有命名props的函数(非常常见) */
onChange: (id: number) => void;
/** 接受事件的函数类型语法(非常常见) */
onChange: (event: React.ChangeEvent<HTMLInputElement>) => void;
/** 接受事件的替代函数类型语法(非常常见) */
onClick(event: React.MouseEvent<HTMLButtonElement>): void;
/** 一个可选的props(非常常见!) */
optional?: OptionalType;
};
三、有用的 React Prop 类型示例
export declare interface AppProps {
children?: React.ReactNode; // 最好,接受 React 可以渲染的所有内容
childrenElement: JSX.Element; // 单个 React 元素
style?: React.CSSProperties; // 传递样式props
onChange?: React.FormEventHandler<HTMLInputElement>; // 形成事件!泛型参数是 event.target 的类型
props: Props & React.ComponentPropsWithoutRef<"button">; // 模拟按钮元素的所有 props 并明确不转发其 ref
props2: Props & React.ComponentPropsWithRef<MyButtonWithForwardRef>; // 模拟 MyButtonForwardedRef 的所有 props 并显式转发其 ref
}
type还是interface?
这是一个有用的经验法则:
在创作库或第 3 方环境类型定义时,始终用于公共 API 的定义,因为这允许使用者在缺少某些定义时通过声明合并来扩展它们。
考虑为您的 React 组件 Props 和 State 使用,以保持一致性并且因为它受到更多限制。
四、函数组件
这些可以写成普通函数,接受一个props参数并返回一个 JSX 元素。
type AppProps = {
message: string;
}; /* 如果导出使用 `interface` 以便消费者可以扩展 */
// 声明函数组件的最简单方法;推断返回类型。
const App = ({ message }: AppProps) => <div>{message}</div>;
// 您可以选择注释返回类型,这样如果您不小心返回了其他类型,则会引发错误
const App = ({ message }: AppProps): JSX.Element => <div>{message}</div>;
// 你也可以内联类型声明;消除了命名props类型,但看起来重复
const App = ({ message }: { message: string }) => <div>{message}</div>;
hook
useState
类型推断对于简单值非常有效:
const [state, setState] = useState(false);
// `state` 被推断为布尔值
// `setState` 只接受布尔值
许多钩子都是用 null-ish 默认值初始化的,你可能想知道如何提供类型。
显式声明类型,并使用联合类型:
const [user, setUser] = useState<User | null>(null);
setUser(newUser);
如果状态在设置后不久初始化并且始终具有以下值,还可以使用类型断言:
const [user, setUser] = useState<User>({} as User);
setUser(newUser);
useReducer
您可以将有区别的联合用于 reducer 操作。不要忘记定义reducer的返回类型,否则TypeScript会推断出来。
import { useReducer } from "react";
const initialState = { count: 0 };
type ACTIONTYPE =
| { type: "increment"; payload: number }
| { type: "decrement"; payload: string };
function reducer(state: typeof initialState, action: ACTIONTYPE) {
switch (action.type) {
case "increment":
return { count: state.count + action.payload };
case "decrement":
return { count: state.count - Number(action.payload) };
default:
throw new Error();
}
}
function Counter() {
const [state, dispatch] = useReducer(reducer, initialState);
return (
<>
Count: {state.count}
<button onClick={() => dispatch({ type: "decrement", payload: "5" })}>
-
</button>
<button onClick={() => dispatch({ type: "increment", payload: 5 })}>
+
</button>
</>
);
}
useEffect / useLayoutEffect
useEffect和都useLayoutEffect用于执行副作用并返回一个可选的清理函数,这意味着如果它们不处理返回值,则不需要类型。
使用 时useEffect,注意不要返回除函数 or 以外的任何东西undefined,否则 TypeScript 和 React 都会提示你。
这在使用箭头函数时可能很微妙:
function DelayedEffect(props: { timerMs: number }) {
const { timerMs } = props;
useEffect(
() =>
setTimeout(() => {
/* do stuff */
}, timerMs),
[timerMs]
);
// 反面例子!setTimeout 隐式返回一个数字
// 因为箭头函数体没有用大括号括起来
return null;
}
useRef
在 TypeScript 中,返回一个只读或可变useRef的引用,取决于您的类型参数是否完全覆盖初始值。选择一个适合您的用例。
1、DOM 元素 ref
访问 DOM 元素:
仅提供元素类型作为参数,并null用作初始值。.current在这种情况下,返回的引用将具有由 React 管理的只读引用TypeScript 期望将此 ref 提供给元素的ref prop:
function Foo() {
// - 如果可能,请尽可能具体。例如,HTMLDivElement
// 比 HTMLElement 好,也比 Element 好得多。
// - 从技术上讲,这会返回 RefObject<HTMLDivElement>
const divRef = useRef<HTMLDivElement>(null);
useEffect(() => {
// 注意 ref.current 可能为空。这是意料之中的
// 有条件地渲染被引用的元素,或者你可能忘记分配它
if (!divRef.current) throw Error("divRef is not assigned");
// 现在 divRef.current 肯定是 HTMLDivElement
doSomethingWith(divRef.current);
});
// 将 ref 赋予一个元素,以便 React 可以管理它
return <div ref={divRef}>etc</div>;
}
如果确定divRef.current永远不会为空,也可以使用非空断言运算符!:
const divRef = useRef<HTMLDivElement>(null!);
// 无需检查是否为空
doSomethingWith(divRef.current);
2、可变值 ref
要具有可变值:提供您想要的类型,并确保初始值完全属于该类型:
function Foo() {
// 从技术上讲,这将返回 MutableRefObject<number | 空>
const intervalRef = useRef<number | null>(null);
// 你自己管理 ref(这就是为什么它被称为 MutableRefObject!)
useEffect(() => {
intervalRef.current = setInterval(...);
return () => clearInterval(intervalRef.current);
}, []);
// ref 不会传递给任何元素的 "ref" 属性
return <button onClick={/* clearInterval the ref */}>Cancel timer</button>;
}
自定义hook
如果你在自定义 Hook 中返回一个数组,你会想要避免类型推断,因为 TypeScript 会推断一个联合类型(当你实际上想要在数组的每个位置使用不同的类型时)
import { useState } from "react";
export function useLoading() {
const [isLoading, setState] = useState(false);
const load = (aPromise: Promise<any>) => {
setState(true);
return aPromise.finally(() => setState(false));
};
return [isLoading, load] as const; // 推断 [boolean, typeof load] 而不是 (boolean | typeof load)[]
}
五、类组件
在TypeScript 中,React.Component是一个泛型类型(aka React.Component<PropType, StateType>),因此希望为它提供(可选)prop 和 state 类型参数:
type MyProps = {
// 使用 `interface` 也可以
message: string;
};
type MyState = {
count: number; // 像这样
};
class App extends React.Component<MyProps, MyState> {
state: MyState = {
// 可选的第二个注解,用于更好的类型推断
count: 0,
};
render() {
return (
<div>
{this.props.message} {this.state.count}
</div>
);
}
}
Tips: 可以导出/导入/扩展这些类型/接口以供重用。
类方法:像往常一样做,要记住函数的任何参数也需要输入:
class App extends React.Component<{ message: string }, { count: number }> {
state = { count: 0 };
render() {
return (
<div onClick={() => this.increment(1)}>
{this.props.message} {this.state.count}
</div>
);
}
increment = (amt: number) => {
this.setState((state) => ({
count: state.count + amt,
}));
};
}
类属性:如果需要声明类属性以供以后使用,只需将其声明为state,但无需赋值:
class App extends React.Component<{
message: string;
}> {
pointer: number; // 像这样
componentDidMount() {
this.pointer = 3;
}
render() {
return (
<div>
{this.props.message} and {this.pointer}
</div>
);
}
}
getDerivedStateFromProps
派生状态可以使用钩子来实现,这也可以帮助设置memoization。
以下是可以注释的几种方法getDerivedStateFromProps
1、如果已显式键入派生状态并希望确保 from 的返回值getDerivedStateFromProps符合它。
class Comp extends React.Component<Props, State> {
static getDerivedStateFromProps(
props: Props,
state: State
): Partial<State> | null {
//
}
}
2、希望函数的返回值确定的状态时。
class Comp extends React.Component<
Props,
ReturnType<typeof Comp["getDerivedStateFromProps"]>
> {
static getDerivedStateFromProps(props: Props) {}
}
3、想要具有其他状态字段和记忆的派生状态时
type CustomValue = any;
interface Props {
propA: CustomValue;
}
interface DefinedState {
otherStateField: string;
}
type State = DefinedState & ReturnType<typeof transformPropsToState>;
function transformPropsToState(props: Props) {
return {
savedPropA: props.propA, // 保存以备memoization
derivedState: props.propA,
};
}
class Comp extends React.PureComponent<Props, State> {
constructor(props: Props) {
super(props);
this.state = {
otherStateField: "123",
...transformPropsToState(props),
};
}
static getDerivedStateFromProps(props: Props, state: State) {
if (isEqual(props.propA, state.savedPropA)) return null;
return transformPropsToState(props);
}
}
六、form和event
如果需要单独定义事件处理程序,IDE 工具在这里真的很方便,因为 @type 定义带有丰富的类型。输入要查找的内容,通常自动完成功能会为您提供帮助。onChange这是表单事件的样子
type State = {
text: string;
};
class App extends React.Component<Props, State> {
state = {
text: "",
};
// 在 = 的右侧输入
onChange = (e: React.FormEvent<HTMLInputElement>): void => {
this.setState({ text: e.currentTarget.value });
};
render() {
return (
<div>
<input type="text" value={this.state.text} onChange={this.onChange} />
</div>
);
}
}
React.FormEvent<>除了使用and键入参数和返回值void,您还可以将类型应用于事件处理程序本身
// 在 = 的左侧输入
onChange: React.ChangeEventHandler<HTMLInputElement> = (e) => {
this.setState({text: e.currentTarget.value})
}
键入 onSubmit,在表单中包含不受控制的组件
如果不太关心事件的类型,可以使用 React.SyntheticEvent。
如果目标表单具有想要访问的自定义命名输入,可以使用类型断言:
<form
ref={formRef}
onSubmit={(e: React.SyntheticEvent) => {
e.preventDefault();
const target = e.target as typeof e.target & {
email: { value: string };
password: { value: string };
};
const email = target.email.value; // 类型检查!
const password = target.password.value; // 类型检查!
// ...
}}
>
<div>
<label>
Email:
<input type="email" name="email" />
</label>
</div>
<div>
<label>
Password:
<input type="password" name="password" />
</label>
</div>
<div>
<input type="submit" value="Log in" />
</div>
</form>
事件类型列表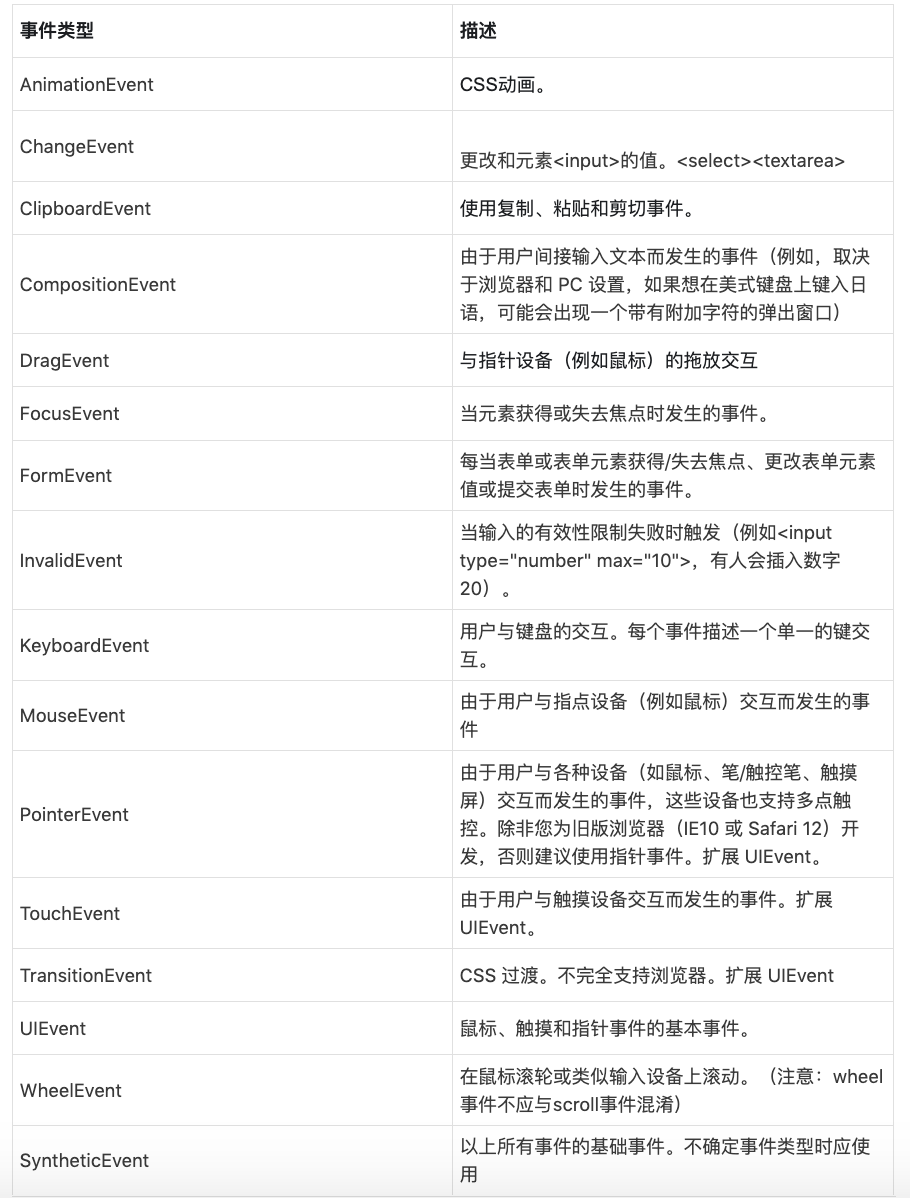
七、Context
基本示例
import { createContext } from "react";
interface AppContextInterface {
name: string;
author: string;
url: string;
}
const AppCtx = createContext<AppContextInterface | null>(null);
// 应用程序中的提供程序
const sampleAppContext: AppContextInterface = {
name: "Using React Context in a Typescript App",
author: "thehappybug",
url: "http://www.example.com",
};
export const App = () => (
<AppCtx.Provider value={sampleAppContext}>...</AppCtx.Provider>
);
// 在你的应用中使用
import { useContext } from "react";
export const PostInfo = () => {
const appContext = useContext(AppCtx);
return (
<div>
Name: {appContext.name}, Author: {appContext.author}, Url:{" "}
{appContext.url}
</div>
);
};
扩展示例
使用createContext空对象作为默认值
interface ContextState {
// 使用上下文设置你想要处理的状态类型,例如
name: string | null;
}
// 设置一个空对象为默认状态
const Context = createContext({} as ContextState);
// 像在 JavaScript 中一样设置上下文提供程序
使用createContext 和 context getters来制作 a createCtx with no ,但无需检查:
import { createContext, useContext } from "react";
const currentUserContext = createContext<string | undefined>(undefined);
function EnthusasticGreeting() {
const currentUser = useContext(currentUserContext);
return <div>HELLO {currentUser!.toUpperCase()}!</div>;
}
function App() {
return (
<currentUserContext.Provider value="Anders">
<EnthusasticGreeting />
</currentUserContext.Provider>
);
}
注意我们需要的显式类型参数,因为我们没有默认string值:
const currentUserContext = createContext<string | undefined>(undefined);
// ^^^^^^^^^^^^^^^^^^
连同非空断言告诉 TypeScript currentUser肯定会在那里:
return <div>HELLO {currentUser!.toUpperCase()}!</div>;
//
这是不幸的,因为我们知道稍后在我们的应用程序中,a Provider将填充上下文。
有几个解决方案:
1、可以通过断言非空来解决这个问题:
const currentUserContext = createContext<string>(undefined!);
2、我们可以编写一个名为的辅助函数createCtx来防止访问Context未提供值的 a。通过这样做,API 相反,我们不必提供默认值,也不必检查:
import { createContext, useContext } from "react";
/**
* 创建上下文和提供者的助手,没有预先的默认值,并且
* 无需一直检查未定义。
*/
function createCtx<A extends {} | null>() {
const ctx = createContext<A | undefined>(undefined);
function useCtx() {
const c = useContext(ctx);
if (c === undefined)
throw new Error("useCtx must be inside a Provider with a value");
return c;
}
return [useCtx, ctx.Provider] as const; // 'as const' 使 TypeScript 推断出一个元组
}
// 用法:
// 我们仍然需要指定一个类型,但没有默认值!
export const [useCurrentUserName, CurrentUserProvider] = createCtx<string>();
function EnthusasticGreeting() {
const currentUser = useCurrentUserName();
return <div>HELLO {currentUser.toUpperCase()}!</div>;
}
function App() {
return (
<CurrentUserProvider value="Anders">
<EnthusasticGreeting />
</CurrentUserProvider>
);
}
3、可以更进一步,使用createContext和context getters结合这个想法。
import { createContext, useContext } from "react";
/**
* 创建上下文和提供者的助手,没有预先的默认值,并且
* 无需一直检查未定义。
*/
function createCtx<A extends {} | null>() {
const ctx = createContext<A | undefined>(undefined);
function useCtx() {
const c = useContext(ctx);
if (c === undefined)
throw new Error("useCtx must be inside a Provider with a value");
return c;
}
return [useCtx, ctx.Provider] as const; // 'as const' 使 TypeScript 推断出一个元组
}
// 用法
export const [useCtx, SettingProvider] = createCtx<string>(); // 指定类型,但不需要预先指定值
export function App() {
const key = useCustomHook("key"); // 从钩子中获取值,必须在组件中
return (
<SettingProvider value={key}>
<Component />
</SettingProvider>
);
}
export function Component() {
const key = useCtx(); // 仍然可以在没有空检查的情况下使用!
return <div>{key}</div>;
}
4、使用createContext and useContext制作一个createCtx with unstated-like 上下文设置器:
import {
createContext,
Dispatch,
PropsWithChildren,
SetStateAction,
useState,
} from "react";
export function createCtx<A>(defaultValue: A) {
type UpdateType = Dispatch<SetStateAction<typeof defaultValue>>;
const defaultUpdate: UpdateType = () => defaultValue;
const ctx = createContext({
state: defaultValue,
update: defaultUpdate,
});
function Provider(props: PropsWithChildren<{}>) {
const [state, update] = useState(defaultValue);
return <ctx.Provider value={{ state, update }} {...props} />;
}
return [ctx, Provider] as const; // 或者,[typeof ctx, typeof Provider]
}
// 用法
import { useContext } from "react";
const [ctx, TextProvider] = createCtx("someText");
export const TextContext = ctx;
export function App() {
return (
<TextProvider>
<Component />
</TextProvider>
);
}
export function Component() {
const { state, update } = useContext(TextContext);
return (
<label>
{state}
<input type="text" onChange={(e) => update(e.target.value)} />
</label>
);
}
八、forwardRef/createRef
检查Hooks 部分的useRef.
createRef:
import { createRef, PureComponent } from "react";
class CssThemeProvider extends PureComponent<Props> {
private rootRef = createRef<HTMLDivElement>(); // 像这样
render() {
return <div ref={this.rootRef}>{this.props.children}</div>;
}
}
forwardRef:
import { forwardRef, ReactNode } from "react";
interface Props {
children?: ReactNode;
type: "submit" | "button";
}
export type Ref = HTMLButtonElement;
export const FancyButton = forwardRef<Ref, Props>((props, ref) => (
<button ref={ref} className="MyClassName" type={props.type}>
{props.children}
</button>
));
通用 forwardRefs
1 - Wrapper component
type ClickableListProps<T> = {
items: T[];
onSelect: (item: T) => void;
mRef?: React.Ref<HTMLUListElement> | null;
};
export function ClickableList<T>(props: ClickableListProps<T>) {
return (
<ul ref={props.mRef}>
{props.items.map((item, i) => (
<li key={i}>
<button onClick={(el) => props.onSelect(item)}>Select</button>
{item}
</li>
))}
</ul>
);
}
2 - Redeclare forwardRef
// 重新声明 forwardRef
declare module "react" {
function forwardRef<T, P = {}>(
render: (props: P, ref: React.Ref<T>) => React.ReactElement | null
): (props: P & React.RefAttributes<T>) => React.ReactElement | null;
}
// 只需像以前一样编写组件!
import { forwardRef, ForwardedRef } from "react";
interface ClickableListProps<T> {
items: T[];
onSelect: (item: T) => void;
}
function ClickableListInner<T>(
props: ClickableListProps<T>,
ref: ForwardedRef<HTMLUListElement>
) {
return (
<ul ref={ref}>
{props.items.map((item, i) => (
<li key={i}>
<button onClick={(el) => props.onSelect(item)}>Select</button>
{item}
</li>
))}
</ul>
);
}
export const ClickableList = forwardRef(ClickableListInner);
九、有用的hooks
useLocalStorage
import { useState } from "react";
// 用法
function App() {
// 类似于 useState 但第一个 arg 是本地存储中值的键。
const [name, setName] = useLocalStorage<string>("name", "Bob");
return (
<div>
<input
type="text"
placeholder="Enter your name"
value={name}
onChange={(e) => setName(e.target.value)}
/>
</div>
);
}
// Hook
function useLocalStorage<T>(
key: string,
initialValue: T
): [T, (value: T | ((val: T) => T)) => void] {
// 状态来存储我们的值
// 将初始状态函数传递给 useState,因此逻辑只执行一次
const [storedValue, setStoredValue] = useState<T>(() => {
try {
// 按键从本地存储中获取
const item = window.localStorage.getItem(key);
// 解析存储的 json 或者如果没有则返回 initialValue
return item ? JSON.parse(item) : initialValue;
} catch (error) {
// 如果错误也返回initialValue
console.log(error);
return initialValue;
}
});
// 返回 useState 的 setter 函数的包装版本,它...
// ... 将新值保存到 localStorage。
const setValue = (value: T | ((val: T) => T)) => {
try {
// 允许 value 是一个函数,所以我们有与 useState 相同的 API
const valueToStore =
value instanceof Function ? value(storedValue) : value;
// 保存状态
setStoredValue(valueToStore);
// 保存到本地存储
window.localStorage.setItem(key, JSON.stringify(valueToStore));
} catch (error) {
// 更高级的实现将处理错误情况
console.log(error);
}
};
return [storedValue, setValue];
}
useMedia
import { useState, useEffect } from 'react';
function App() {
const columnCount = useMedia<number>(
// 媒体查询
['(min-width: 1500px)', '(min-width: 1000px)', '(min-width: 600px)'],
// 列数(与上述按数组索引的媒体查询有关)
[5, 4, 3],
// 默认列数
2
);
// 创建列高数组(从 0 开始)
let columnHeights = new Array(columnCount).fill(0);
// 创建包含每列项目的数组数组
let columns = new Array(columnCount).fill().map(() => []) as Array<DataProps[]>;
(data as DataProps[]).forEach(item => {
// 获取最短列的索引
const shortColumnIndex = columnHeights.indexOf(Math.min(...columnHeights));
// 添加项目
columns[shortColumnIndex].push(item);
// 更新高度
columnHeights[shortColumnIndex] += item.height;
});
// 渲染列和项目
return (
<div className="App">
<div className="columns is-mobile">
{columns.map(column => (
<div className="column">
{column.map(item => (
<div
className="image-container"
style={{
// 将图像容器大小调整为图像的纵横比
paddingTop: (item.height / item.width) * 100 + '%'
}}
>
<img src={item.image} alt="" />
</div>
))}
</div>
))}
</div>
</div>
);
}
// Hook
const useMedia = <T>(queries: string[], values: T[], defaultValue: T) => {
// 包含每个查询的媒体查询列表的数组
const mediaQueryLists = queries.map(q => window.matchMedia(q));
// 根据匹配的媒体查询获取值的函数
const getValue = () => {
// 获取第一个匹配的媒体查询的索引
const index = mediaQueryLists.findIndex(mql => mql.matches);
// 返回相关值,如果没有则返回默认值
return values?.[index] || defaultValue;
};
// 匹配值的状态和设置器
const [value, setValue] = useState<T>(getValue);
useEffect(
() => {
// 事件监听回调
// 注意:通过在 useEffect 之外定义 getValue,我们确保它具有 ...
// ... 钩子参数的当前值(因为这个钩子回调在挂载时创建一次)。
const handler = () => setValue(getValue);
// 使用上述处理程序为每个媒体查询设置一个侦听器作为回调。
mediaQueryLists.forEach(mql => mql.addListener(handler));
// 在清理时移除监听器
return () => mediaQueryLists.forEach(mql => mql.removeListener(handler));
},
[] // 空数组确保效果仅在挂载和卸载时运行
);
return value;
}
useAsyncTask
// 用法
const task = useAsyncTask(async (data: any) => await myApiRequest(data));
task.run(data);
useEffect(() => {
console.log(task.status); // 'IDLE' | 'PROCESSING' | 'ERROR' | 'SUCCESS';
}, [task.status]);
// 执行
import { useCallback, useState } from "react";
type TStatus = "IDLE" | "PROCESSING" | "ERROR" | "SUCCESS";
function useAsyncTask<T extends any[], R = any>(
task: (...args: T) => Promise<R>
) {
const [status, setStatus] = useState<TStatus>("IDLE");
const [message, setMessage] = useState("");
const run = useCallback(async (...arg: T) => {
setStatus("PROCESSING");
try {
const resp: R = await task(...arg);
setStatus("SUCCESS");
return resp;
} catch (error) {
let message = error?.response?.data?.error?.message || error.message;
setMessage(message);
setStatus("ERROR");
throw error;
}
}, []);
const reset = useCallback(() => {
setMessage("");
setStatus("IDLE");
}, []);
return {
run,
status,
message,
reset,
};
}
export default useAsyncTask;
useFetch
export function useFetch(request: RequestInfo, init?: RequestInit) {
const [response, setResponse] = useState<null | Response>(null);
const [error, setError] = useState<Error | null>();
const [isLoading, setIsLoading] = useState(true);
useEffect(() => {
const abortController = new AbortController();
setIsLoading(true);
(async () => {
try {
const response = await fetch(request, {
...init,
signal: abortController.signal,
});
setResponse(await response?.json());
setIsLoading(false);
} catch (error) {
if (isAbortError(error)) {
return;
}
setError(error as any);
setIsLoading(false);
}
})();
return () => {
abortController.abort();
};
}, [init, request]);
return { response, error, isLoading };
}
// type guards
function isAbortError(error: any): error is DOMException {
if (error && error.name === "AbortError") {
return true;
}
return false;
}
十、HOC
一个 HOC 示例
注入props
interface WithThemeProps {
primaryColor: string;
}
在组件中的使用
在组件的接口上提供可用的props,但在包装在 HoC 中时为组件的消费者减去。
interface Props extends WithThemeProps {
children?: React.ReactNode;
}
class MyButton extends React.Component<Props> {
public render() {
// 使用主题和其他props渲染元素。
}
private someInternalMethod() {
// 主题值也可在此处作为props使用。
}
}
export default withTheme(MyButton);
使用组件
现在,在使用组件时,可以省略primaryColor props或覆盖通过上下文提供的props。
<MyButton>Hello button</MyButton> // 有效
<MyButton primaryColor="#333">Hello Button</MyButton> // 同样有效
声明 HoC
实际的 HoC。
export function withTheme<T extends WithThemeProps = WithThemeProps>(
WrappedComponent: React.ComponentType<T>
) {
// 尝试为 React 开发工具创建一个不错的 displayName。
const displayName =
WrappedComponent.displayName || WrappedComponent.name || "Component";
// 创建内部组件。这里计算出来的 Props 类型是魔法发生的地方。
const ComponentWithTheme = (props: Omit<T, keyof WithThemeProps>) => {
// 获取要注入的props。这可以通过上下文来完成。
const themeProps = useTheme();
// props随后出现,因此可以覆盖默认值。
return <WrappedComponent {...themeProps} {...(props as T)} />;
};
ComponentWithTheme.displayName = `withTheme(${displayName})`;
return ComponentWithTheme;
}
这是一个更高级的动态高阶组件示例,它的一些参数基于传入的组件的 props:
// 向组件注入静态值,以便始终提供它们
export function inject<TProps, TInjectedKeys extends keyof TProps>(
Component: React.JSXElementConstructor<TProps>,
injector: Pick<TProps, TInjectedKeys>
) {
return function Injected(props: Omit<TProps, TInjectedKeys>) {
return <Component {...(props as TProps)} {...injector} />;
};
}
使用forwardRef
对于“真正的”可重用性,还应该考虑为 HOC 公开一个 ref。
十一、Linting
yarn add -D @typescript-eslint/eslint-plugin @typescript-eslint/parser eslint
将lint脚本添加到您的package.json:
"scripts": {
"lint": "eslint 'src/**/*.ts'"
},
一个合适的.eslintrc.js
module.exports = {
env: {
es6: true,
node: true,
jest: true,
},
extends: "eslint:recommended",
parser: "@typescript-eslint/parser",
plugins: ["@typescript-eslint"],
parserOptions: {
ecmaVersion: 2017,
sourceType: "module",
},
rules: {
indent: ["error", 2],
"linebreak-style": ["error", "unix"],
quotes: ["error", "single"],
"no-console": "warn",
"no-unused-vars": "off",
"@typescript-eslint/no-unused-vars": [
"error",
{ vars: "all", args: "after-used", ignoreRestSiblings: false },
],
"@typescript-eslint/explicit-function-return-type": "warn", // 考虑对对象字面量和函数返回类型使用显式注释,即使它们可以被推断出来。
"no-empty": "warn",
},
};
更多.eslintrc.json选项需要考虑,可能需要更多应用选项:
{
"extends": [
"airbnb",
"prettier",
"prettier/react",
"plugin:prettier/recommended",
"plugin:jest/recommended",
"plugin:unicorn/recommended"
],
"plugins": ["prettier", "jest", "unicorn"],
"parserOptions": {
"sourceType": "module",
"ecmaFeatures": {
"jsx": true
}
},
"env": {
"es6": true,
"browser": true,
"jest": true
},
"settings": {
"import/resolver": {
"node": {
"extensions": [".js", ".jsx", ".ts", ".tsx"]
}
}
},
"overrides": [
{
"files": ["**/*.ts", "**/*.tsx"],
"parser": "typescript-eslint-parser",
"rules": {
"no-undef": "off"
}
}
]
}
十二、最后
在我们阅读完官方文档后,我们一定会进行更深层次的学习,比如看下框架底层是如何运行的,以及源码的阅读。
这里广东靓仔给下一些小建议:
在看源码前,我们先去官方文档复习下框架设计理念、源码分层设计
阅读下框架官方开发人员写的相关文章
借助框架的调用栈来进行源码的阅读,通过这个执行流程,我们就完整的对源码进行了一个初步的了解
接下来再对源码执行过程中涉及的所有函数逻辑梳理一遍
作者:广东靓仔
欢迎关注:前端早茶

 分类导航
分类导航