

 个人中心
个人中心 退出
退出


Vue开发实战-教程篇
一、前言
本文基于开源项目:
https://github1s.com/vuejs/vue
https://vuejs.org/
最近有不少小伙伴私聊广东靓仔,能不能出一期关于vue日常项目开发的文章,广东靓仔整理了以往开发过的vue项目,结合目前业界主流方案,因此有了这篇文章。
目录:
自定义Webpack和Babel配置
设计一个高扩展性的路由
可动态改变的页面布局
将菜单和路由结合
精细化的权限设计
使用其他第三方库
使用Mock数据进行开发
引入Axios
管理系统中使用的图标
定制主题及动态切换主题
国际化
构建打包发布
做好组件的单元测试
二、现有方案
目前业界有很多现成的解决方案,广东靓仔列举了几个:
Ant Design Pro
D2 Admin截图
soybean-admin截图
以上都是比较稳定的管理系统解决方案,有兴趣的小伙伴可以去看看~下面我们一起来梳理梳理,vue实际开发的一些需要考虑到的点。
三、正文
在使用vue开发我们项目的时候,一般的都是采用现有的开源项目,然后进行一些改造(二次开发),来满足我们的业务需求,这种方案效率是最高的,成本也是最低的。
下面开始讲讲vue实际项目开发需要关注的模块,具体内容如下所示:
使用Vue CLI 3快速创建项目
脚手架,不是本文要讲的重点,随便看看即可~
全局安装
npm install -g @vue/cli
or
yarn global add @vue/cli
新建项目
vue create my-project
最后启动项目,看到如下效果:
自定义Webpack和Babel配置
webpack.config.js代码如下:
let path = require('path');
let webpack = require('webpack');
/*
html-webpack-plugin插件,webpack中生成HTML的插件,
具体可以去这里查看https://www.npmjs.com/package/html-webpack-plugin
*/
let HtmlWebpackPlugin = require('html-webpack-plugin');
/*
webpack插件,提取公共模块
*/
let CommonsChunkPlugin = webpack.optimize.CommonsChunkPlugin;
let config = {
//入口文件配置
entry: {
index: path.resolve(__dirname, 'src/js/page/index.js'),
vendors: ['vue', 'vue-router','vue-resource','vuex','element-ui','element-ui/lib/theme-default/index.css'] // 需要进行单独打包的文件
},
//出口文件配置
output: {
path: path.join(__dirname, 'dist'), //输出目录的配置,模板、样式、脚本、图片等资源的路径配置都相对于它
publicPath: '/dist/', //模板、样式、脚本、图片等资源对应的server上的路径
filename: 'js/[name].js', //每个页面对应的主js的生成配置
chunkFilename: 'js/[name].asyncChunk.js?'+new Date().getTime() //chunk生成的配置
},
module: {
//加载器
rules: [
{
test: /\.vue$/,
loader: 'vue-loader',
options: {
loaders: {
scss: 'vue-style-loader!css-loader!sass-loader', // <style lang="scss">
sass: 'vue-style-loader!css-loader!sass-loader?indentedSyntax' // <style lang="sass">
}
}
},
{
test: /\.html$/,
loader: "raw-loader"
},
{
test: /\.css$/,
loader: 'style-loader!css-loader'
},
{
test: /\.js$/,
exclude: /node_modules/,
loader: "babel-loader",
options: {
presets: ["es2015","stage-0"],
plugins: ['syntax-dynamic-import']
}
},
{
test: /\.scss$/,
loader: 'style-loader!css-loader!sass-loader'
},
{
test: /\.(eot|svg|ttf|woff|woff2)(\?\S*)?$/,
loader: 'file-loader'
},
{
//图片加载器,雷同file-loader,更适合图片,可以将较小的图片转成base64,减少http请求
//如下配置,将小于8192byte的图片转成base64码
test: /\.(png|jpg|gif)$/,
loader: 'url-loader?limit=8192&name=images/[hash].[ext]'
}
]
},
//插件
plugins: [
//webpack3.0的范围提升
new webpack.optimize.ModuleConcatenationPlugin(),
//打包生成html文件,并且将js文件引入进来
new HtmlWebpackPlugin({
filename: path.resolve(__dirname, 'dist/html/index.html'), //生成的html存放路径,相对于path
template: path.resolve(__dirname, 'src/html/index.html'), //ejs模板路径,前面最好加上loader用于处理
inject: 'body', //js插入的位置,true/'head'/'body'/false
hash: true
}),
//提取功能模块
new CommonsChunkPlugin({
name: 'vendors', // 将公共模块提取,生成名为`vendors`的chunk
minChunks: 2, //公共模块被使用的最小次数。配置为2,也就是同一个模块只有被2个以外的页面同时引用时才会被提取出来作为common chunks
// children:true //如果为true,那么公共组件的所有子依赖都将被选择进来
}),
],
//使用webpack-dev-server,启动热刷新插件
devServer: {
contentBase: path.join(__dirname, "/"),
host: 'localhost', //建议写IP地址,开发时候电脑的ip地址。localhost我不知道是幻觉还是怎样,有时候热刷新不灵敏
port: 9090, //默认9090
inline: true, //可以监控js变化
hot: true//热启动
},
//搜索路径变量
resolve: {
alias: {
vue: 'vue/dist/vue.js'
},
extensions:['.js','.scss','.vue','.json']// 可以不加后缀, 直接使用 import xx from 'xx' 的语法
}
};
module.exports = config;
设计一个高扩展性的路由
根据页面展示结构进行抽象,结合业务模块进行的合理层级划分
router.js代码如下:
import Vue from 'vue';
import Router from 'vue-router'
import NProgress from 'nprogress'
import 'nprogress/nprogress.css'
import NotFound from '../views/404';
Vue.use(Router);
const router = new Router({
mode: 'history',
routes: [
{path:'/',redirect: '/user/login'},
{
path: '/user',
component: {render: h=>h("router-view")},
children: [{
path: 'login',
name: 'index',
component: () =>
import( /* webpackChunkName: "user" */ '../views/User/Login')
},
{
path: 'register',
name: 'news',
component: () =>
import( /* webpackChunkName: "user" */ '../views/User/Register')
},
{
path: '*',
name: '404',
component:NotFound
}
]
}]
})
router.beforeEach((to,form,next)=>{
NProgress.start();
next();
});
router.afterEach(() => {
NProgress.done();
});
export default router
可动态改变的页面布局
方案一:
定义好数据格式,一个页面可以把它划分成多个组件来构成,例如一个基本的布局:
header,main,footer。那么就可以划分成三个组件,为这三个组件添加样式,属性,事件。
{
header:{
style:{},
property:{},
event:{}
},
main:{
style:{},
property:{},
event:{}
}
}
当数据添加进去,生成的页面就应该根据这些数据来渲染
方案二:
定义模板,根据需要切换
var hdInput = {
template: "<div><input/></div>"
};
var hdTextarea = {
template: "<div><textarea></textarea></div>"
};
new Vue({
el: "#hdcms",
components: {hdInput,hdTextarea},
data:{
formType:"hdInput"
}
});
将菜单和路由结合
具体方案:
1.前端在本地写好路由表,以及每个路由对应的角色,也就是哪些角色可以看到这个菜单/路由;
2.登录的时候,向后端请求得到登录用户的角色(管理者、普通用户);
3.利用路由拦截,根据取到的用户角色,跟本地的路由表进行对比,过滤出用户对应的路由,并利用路由进行左侧菜单渲染
一、本地写好路由表
router/index.js
//代码位置:router/index.js
{
path: '',
component: layout, //整体页面的布局(包含左侧菜单跟主内容区域)
children: [{
path: 'main',
component: main,
meta: {
title: '首页', //菜单名称
roles: ['user', 'admin'], //当前菜单哪些角色可以看到
icon: 'el-icon-info' //菜单左侧的icon图标
}
}]
}
二、用户登录,获取用户的角色
获取到用户角色,存放进localStorage,然后跳转主页
//代码位置:src/components/reLoad.vue
// axios.post('/temp',this.formModel).then(res=>{})
// 我暂时就不模拟了,直接取
let getUserRole = this.formModel.user === 'admin' ? 'admin' : 'user'
localStorage.setItem('userRole', getUserRole)
this.$router.push({
path: '/main'
})
三、路由拦截beforeEach,并过滤出角色对应的路由表
关键技术点addRoutes
//代码位置:src/permission.js
router.beforeEach((to, from, next) => {
// 取到用户的角色
let GetRole = localStorage.getItem("userRole")
// 如果登录了
if (GetRole !== 'unload') {
next() //next()方法后的代码也会执行
// 1.如果路由表 没根据角色进行筛选,就筛选一次
if (!addRouFlag) {
addRouFlag = true
// 2.根据用户的角色、和需要动态展示的路由,生成符合用户角色的路由
var getRoutes = baseRoleGetRouters(permissionRouter, GetRole.split(","))
// 3.利用global属性,让渲染菜单的组件sideMeuns.vue重新生成左侧菜单
global.antRouter = fixedRouter.concat(getRoutes)
// 4.将生成好的路由addRoutes
router.addRoutes(fixedRouter.concat(getRoutes))
// 5.push之后,会重新进入到beforeEach的钩子里,直接进入第一个if判断
router.push({ path: to.path })
}
} else {
// 用户没登录,跳转到登录页面
if (to.path === '/') {
next()
} else {
next('/')
}
}
})
精细化的权限设计
权限控制是后台管理系统比较常见的需求,我们需要对某些页面的添加权限控制,可以在路由管理中的权限做一些校验。
一、权限校验函数
getCurrentAuthority()函数用于获取当前用户权限,一般来源于后台数据
check()函数用于权限的校验匹配
isLogin()函数用于检验用户是否登录
/**
*权限校验函数
* /src/utils,/auth.js演示使用路由管理用户权限
**/
// 获取当前用户权限
export function getCurrentAuthority(){
return ["user"];
}
//权限校验
export function check(authority){
const current getCurrentAuthority();
return current.some(item =authority.includes(item));
}
//登录检验
export function isLogin(){
const current getcurrentAuthority();
return current ¤t[0]!="guest";
}
二、路由配置元信息
路由配置元信息meta:{ authority: ["admin"] }
/**
* 路由配置元信息
* /src/router/index.js
*/
const routes =
// 省略部分代码
{
path:"/"
meta:authority:["user","admin"]}
component:()=
import(/*webpackChunkName:"Layout"*/"../layouts/BasicLayout")
//省略部分代码
},
{
path:"/403",
name:"403",
hideInMenu:true,
component:()=
import(/*webpackChunkName:"exception"*/"@/views/Exception/403")
}
];
三、路由守卫router.beforeEach中判断
/**登出于形到物权限
* /src/router/index.js
*/
import findLast from "lodash/findLast";
import {check,isLogin} from "../utils/auth";
import {notification} from "ant-design-vue";
// 路由守卫判断权限
router.beforeEach((to,from,next)=>{
if (to.path I==from.path){
NProgress.start()
}
const record findLast(to.matched,record => record.meta.authority);
if (record && !check(record.meta.authority)){
if (lisLogin()&&to.path !=="/user/login"){
next({
path:"/user/login"
})
} else if(to.path1 !== "/403"){
notification.error({
message:"403",
description:"你设有访间权限,请联系管理员"
})
next({
path:"/403"
})
}
NProgress.done();
}
next();
})
使用ECharts、Antv等其他第三方库
根据项目要求,按需引入
使用第三方的开源库,可以提高效率~
使用Mock数据进行开发
一、安装:
npm i mockjs -D
-D: 仅仅在开发环境上使用
二、项目引入:
在 main.js 文件中引入mock:import '@/mock'
三、创建mock文件夹
// 引入随机函数
import { Random } from 'mockjs'
// 引入Mock
const Mock = require('mockjs')
const userListData = Mock.mock({
'data|10': [
{
id: () => Random.id(),
nickName: () => Random.cword('零一二三四五六七八九十', 3),
phone: () => Random.integer(11111111111, 99999999999),
tgCount: () => Random.integer(0, 200),
earnings: () => Random.float(2000, 10000, 0, 2),
},
],
})
function userList(res) {
return {
code: 200,
data: userListData.data,
message: '获取成功',
total: 20,
size: 10,
user_count: 20,
shop_count: 20,
}
}
const shopListData = Mock.mock({
'data|10': [
{
shop_id: () => Random.id(),
shop_name: () => Random.cword('零一二三四五六七八九十', 3),
address: () => Random.city(true),
shop_tel: () => Random.integer(11111111111, 99999999999),
open_date: () => Random.date(),
earnings: () => Random.float(2000, 10000, 0, 2),
},
],
})
function shopList(res) {
return {
code: 200,
data: shopListData.data,
message: '获取推广店铺成功',
total: 20,
size: 10,
earnings_count: 20000,
shopCount: 20,
}
}
export default {
userList,
shopList,
}
四、定义访问的方法,接口,请求方式,请求参数
import http from '../../plugins/http'
export const getUserList = (params) => {
return http.get('/api/cuz/userList')
}
export const getShopListById = (id) => {
return http.get(`/api/cuz/shopList/${id}`)
}
五、拦截匹配在api中定义的请求,并对此返回模拟出的假数据
// 引入mockjs
import Mock from 'mockjs'
// 引入模板函数类
import ratings from './modules/ratings'
import cuz from './modules/cuz'
// Mock函数
const { mock } = Mock
// 设置延时
Mock.setup({
timeout: 400,
})
// 使用拦截规则拦截命中的请求,mock(url, post/get, 返回的数据);
mock(/\/api\/ratings\/list/, 'post', ratings.list)
mock(/\/api\/cuz\/userList/, 'get', cuz.userList)
mock(/\/api\/cuz\/shopList/, 'get', cuz.shopList)
Axios
一、安装
npm install vue-axios --save
二、main.js引入
import axios from 'axios'
Vue.prototype.$axios = axios //全局注册,使用方法为:this.$axios
三、使用
<script>
export default{
data(){
return{
userId:666,
token:'',
}
},
created(){
this.$axios({
method:'post',
url:'api',
data:this.qs.stringify({ //这里是发送给后台的数据
userId:this.userId,
token:this.token,
})
}).then((response) =>{ //这里使用了ES6的语法
console.log(response) //请求成功返回的数据
}).catch((error) =>
console.log(error) //请求失败返回的数据
})
}
}
</script>
四、请求拦截器
// http request 拦截器
instance.interceptors.request.use(
config => {
const token = sessionStorage.getItem('token')
if (token ) { // 判断是否存在token,如果存在的话,则每个http header都加上token
config.headers.authorization = token //请求头加上token
}
return config
},
err => {
return Promise.reject(err)
})
五、响应拦截器
// http response 拦截器
instance.interceptors.response.use(
response => {
//拦截响应,做统一处理
if (response.data.code) {
switch (response.data.code) {
case 1002:
store.state.isLogin = false
router.replace({
path: 'login',
query: {
redirect: router.currentRoute.fullPath
}
})
}
}
return response
},
//接口错误状态处理,也就是说无响应时的处理
error => {
return Promise.reject(error.response.status) // 返回接口返回的错误信息
})
六、在需要的页面导入就可以使用了
import instance from './axios'
/* 验证登陆 */
export function handleLogin (data) {
return instance.post('/ds/user/login', data)
}
管理系统中使用的图标
项目中的图标需要集中管理起来,方便维护,减少一些图片重复引入
如果对安全没什么特殊要求:推荐使用iconfont
如果对安全有特别要求:把图标统一存放在内部服务
定制主题及动态切换主题
结合ElementUI使用
(Tips: 广东靓仔看到业界关于动态主题大约有6种方案,选了其中一种)
修改ElementUI提供的变量,先根据实际情况修改变量值
// 参考:https://element.eleme.cn/#/zh-CN/component/custom-theme
/* 改变主题色变量 */
$--color-primary: #545C64;
$--color-success: #27B6AF;
$--menu-background-color: #1D212A;
$--menu-item-font-color: #B3B8C3;
$--menu-item-hover-fill: #1F2D3D;
$--main-padding: 15px;
/* 改变 icon 字体路径变量,必需 */
$--font-path: '~element-ui/lib/theme-chalk/fonts';
// 通用的布局等样式
@import "../common";
common.scss片段:
// 自定义变量
$---menu--inline-background-color: #13161C !default;
$---index-header-height: 50px !default;
$---padding-common: 15px !default;
$---margin-common: 15px !default;
$---border-line-color: #E6E6E6 !default;
@import "~element-ui/packages/theme-chalk/src/index";
.el-menu-item.is-active {
color: $--color-white;
background-color: $--menu-item-hover-fill;
font-weight: $--font-weight-primary;
}
// .............更多见GitHub源文件
在main.js中引入
// 样式配置
import './assets/css/main.scss'
动态主题
定义好模板主题文件,这里列举了defaut、simple两个主题
main.scss主要内容:
// 实际样式引入
.theme-simple {
@import "src/assets/themes/simple/index";
}
.theme-default {
@import "src/assets/themes/default/index";
}
切换主题
改变body的样式名称即可,调用$changeTheme(theme):
const $themeList = [
{
id: 'theme-default',
name: '默认主题'
}, {
id: 'theme-simple',
name: '简单主题'
}
]
Vue.prototype.$changeTheme = function (theme = $themeList[0]) {
const body = document.querySelector('body')
$themeList.forEach(t => {
body.classList.remove(t.id)
})
body.classList.add(theme.id)
store.dispatch('Theme/changeTheme', theme) // 暂时保存到store里面
}
Tips: 图标在主题样式显示有点问题,使用font-face兼容下
//***********这块font定义是为了修复问题********************
$--font-path: '~element-ui/lib/theme-chalk/fonts';
@font-face {
font-family: 'element-icons';
src: url('#{$--font-path}/element-icons.woff') format('woff'), url('#{$--font-path}/element-icons.ttf') format('truetype');
font-weight: normal;
font-display: auto;
font-style: normal;
}
做好国际化
i18n
一、 使用国际化来更改咱们的项目语言
简单介绍下i18n如何用
1. 安装:
//使用yarn
yarn add vue-i18n
//npm
npm i vue-i18n -S
2. 使用:
系统中使用它,必须通过 Vue.use() 明确地安装 vue-i18n:
src/i18n/index.js
//src/i18n/index.js
import Vue from 'vue'
import VueI18n from 'vue-i18n'
Vue.use(VueI18n)
// 准备翻译的语言环境信息
const messages = {
en: {
message: {
hello: 'hello world'
}
},
ja: {
message: {
hello: 'こんにちは、世界'
}
}
}
// 通过选项创建 VueI18n 实例
const i18n = new VueI18n({
locale: 'ja', // 设置地区
messages // 设置地区信息
})
3. 将i18n实例挂载在Vue的option中
import Vue from 'vue'
import i18n from "./src/i18n/index.js"
new Vue({
i18n
})
4. 视图显示
<div id="app">
<p>{{ $t("message.hello") }}</p>
</div>
------------------------------------
<!-- 展示效果如下 -->
<div id="app">
<p>hello world</p>
</div>
在插值中使用$t函数就可以了
二、vue-cli项目中使用
1. 创建i18n文件结构
目录结构如下: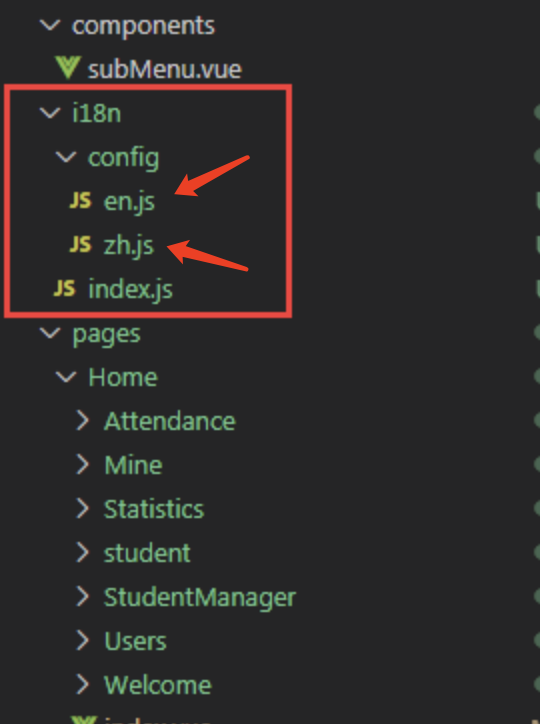
这里列举了两种语言分别是:en英文和zh中文
en.js
export default {
table: { // 假如用于翻译表格
date: "Date",
name: "Name",
address: "Address"
},
menu: {}, // 假如项目中日后还有菜单
tabs: {} // tab切换等
}
zh.js
export default {
table: {
date: "日期",
name: "姓名",
address: "地址"
},
menu: {},
tabs: {}
}
config文件夹下面的index.js,代码如下(二者都可以):
乞丐版:
import en from './config/en'
import id from './config/id'
import ja from './config/ja'
import ae from './config/ae'
import am from './config/am'
import ca from './config/ca'
import al from './config/al'
.....
至尊版:
import Vue from "vue"
import VueI18n from "vue-i18n"
Vue.use(VueI18n)//注入到所有的子组件
//require.context(path,deep,regExp)
//有3个方法 分别是keys()
// 至尊版
let langFileds = require.context('./config', false, /\.js$/)
let regExp = /\.\/([^\.\/]+)\.([^\.]+)$/ //正则用于匹配 ./en.js中的'en'
// regExp.exec('./en.js')
let messages = {} //声明一个数据模型,对应i18n中的message属性
langFileds.keys().forEach(key => {
let prop = regExp.exec(key)[1] //正则匹配en|zh这样的值
//messages[prop]相当于 messages['en'] = {table:{...}}
messages[prop] = langFileds(key).default
})
console.log(messages);
console.log(langFileds('./en.js'));
let locale = localStorage.getItem('lang') || "zh" //从localstorag中获取
export default new VueI18n({
locale,//指定语言字段
messages//定义语言字段
})
2. 修改main.js
import Vue from 'vue'
import App from './App.vue'
import ElementUI from "element-ui" // 需要安装 element-ui
import 'element-ui/lib/theme-chalk/index.css';
Vue.config.productionTip = false
Vue.use(ElementUI)
import i18n from "./i18n" //
new Vue({
render: h => h(App),
i18n // 挂载
}).$mount('#app')
3. 具体使用demo
app.vue
<template>
<div id="app">
<template>
<el-table :data="tableData"
style="width: 100%">
<el-table-column prop="date"
:label="$t('table.date')"
width="180">
</el-table-column>
<el-table-column prop="name"
:label="$t('table.name')"
width="180">
</el-table-column>
<el-table-column prop="address"
:label="$t('table.address')">
</el-table-column>
</el-table>
</template>
<el-button type="primary"
@click="change('zh')">点击切换中文</el-button>
<el-button type="primary"
@click="change('en')">点击切换英文</el-button>
<el-button type="primary"
</div>
</template>
<script>
export default {
mounted() {
console.log(this.$i18n.t('table.date'));
},
methods: {
change(lang) { //切换方法
localStorage.setItem('lang', lang)
window.location.reload() //localSotrage是不响应的,为了演示效果所以直接调用刷新
}
},
data() {
return {
tableData: [{
date: '2016-05-02',
name: '王小虎',
address: '上海市普陀区金沙江路 1518 弄'
}]
}
}
}
</script>
<style>
#app {
width: 50%;
}
</style>
构建打包发布
1. 打包配置如下:
build: {
env: require('./prod.env'),
index: path.resolve(__dirname, '../dist/index.html'),
assetsRoot: path.resolve(__dirname, '../dist'),
assetsSubDirectory: 'static',
assetsPublicPath: './',
productionSourceMap: true,
// 默认情况下,Gzip 关闭了许多流行的静态主机,例如
// Surge 或 Netlify 已经为您压缩了所有静态资产。
// 在设置为 `true` 之前,请确保:
// npm install --save-dev compression-webpack-plugin
productionGzip: false,
productionGzipExtensions: ['js', 'css'],
// 运行带有额外参数的构建命令
// 构建完成后查看包分析器报告:
// `npm run build --report`
// 设置为 `true` 或 `false` 以始终打开或关闭它
bundleAnalyzerReport: process.env.npm_config_report
}
2. 一般部署,我们会结合Nginx一起使用
安装&启动
# 安装,安装完成后使用nginx -v检查,如果输出nginx的版本信息表明安装成功
sudo apt-get install nginx
# 启动
sudo service nginx start
3. 修改nginx配置
nginx的配置文件就在/etc/nginx文件夹
/etc/nginx/sites-available/default
nginx代理的根目录是/var/www/html
mkdir /www
echo 'Hello world' > /www/index.html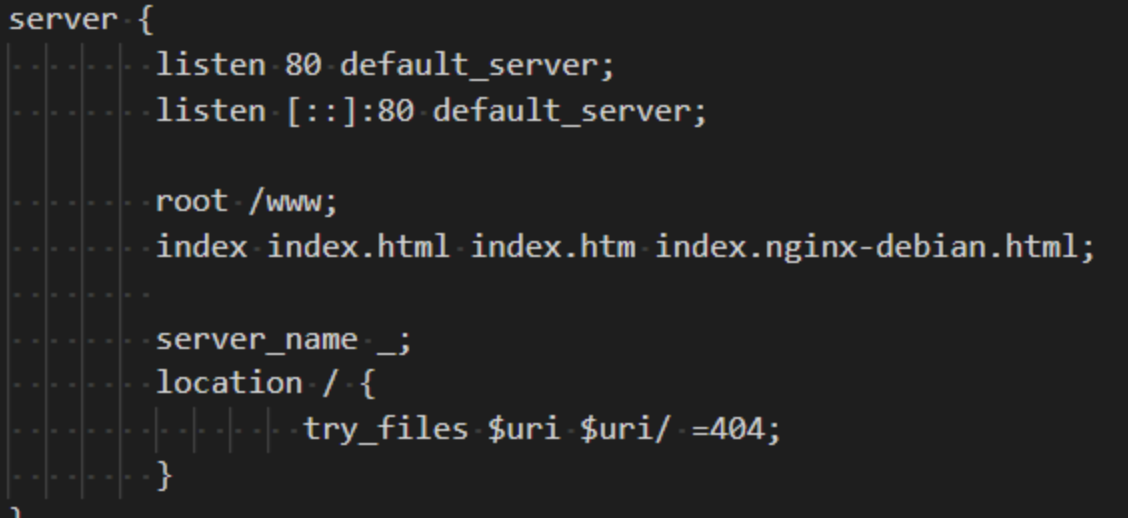
4. 同步到服务器
在git-bash或者powershell使用scp指令,如果是linux环境开发,还可以使用rsync指令:
scp -r dist/* root@117.78.4.26:/www
或
rsync -avr --delete-after dist/* root@117.78.4.26:/www
package.json脚本,方便,提高效率
"scripts": {
"build": "vue-cli-service build",
"push": "yarn build && scp -r dist/* root@117.78.4.26:/www"
},
当然啦,对于history、与hash模式,对应微调下即可~
做好组件的单元测试
Vue 的单文件组件使得为组件撰写隔离的单元测试这件事更加直接
组件的单元测试有很多好处:
提供描述组件行为的文档
节省手动测试的时间
减少研发新特性时产生的 bug
改进设计
促进重构
一个简单的Demo:
<template>
<div>
<div class="message">
{{ message }}
</div>
Enter your username: <input v-model="username">
<div
v-if="error"
class="error"
>
Please enter a username with at least seven letters.
</div>
</div>
</template>
<script>
export default {
name: 'Foo',
data () {
return {
message: 'Welcome to the Vue.js cookbook',
username: ''
}
},
computed: {
error () {
return this.username.trim().length < 7
}
}
}
</script>
单元测试,代码如下:
import { shallowMount } from '@vue/test-utils'
import Foo from './Foo'
const factory = (values = {}) => {
return shallowMount(Foo, {
data () {
return {
...values
}
}
})
}
describe('Foo', () => {
it('renders a welcome message', () => {
const wrapper = factory()
expect(wrapper.find('.message').text()).toEqual("Welcome to the Vue.js cookbook")
})
it('renders an error when username is less than 7 characters', () => {
const wrapper = factory({ username: '' })
expect(wrapper.find('.error').exists()).toBeTruthy()
})
it('renders an error when username is whitespace', () => {
const wrapper = factory({ username: ' '.repeat(7) })
expect(wrapper.find('.error').exists()).toBeTruthy()
})
it('does not render an error when username is 7 characters or more', () => {
const wrapper = factory({ username: 'Lachlan' })
expect(wrapper.find('.error').exists()).toBeFalsy()
})
})
Tips: 工厂函数将 values 对象合并到了 data 并返回了一个新的 wrapper 实例。好处有两个:
1. 不需要在每个测试中重复 const wrapper = shallowMount(Foo)。
2. 当我们想为更复杂的组件在每个测试中伪造或存根一个方法或计算属性时,你只需要声明一次即可。
Vue Test Utils 及庞大的 JavaScript 生态系统提供了大量的工具促进 100% 的测试覆盖率。
推荐阅读:
https://v1.test-utils.vuejs.org/zh/guides/#%E8%B5%B7%E6%AD%A5
四、总结
在我们阅读完官方文档后,我们一定会进行更深层次的学习,比如看下框架底层是如何运行的,以及源码的阅读。
这里广东靓仔给下一些小建议:
在看源码前,我们先去官方文档复习下框架设计理念、源码分层设计
阅读下框架官方开发人员写的相关文章
借助框架的调用栈来进行源码的阅读,通过这个执行流程,我们就完整的对源码进行了一个初步的了解
接下来再对源码执行过程中涉及的所有函数逻辑梳理一遍
作者:广东靓仔
欢迎关注:前端早茶

 分类导航
分类导航