Vue封装Excel导入组件并使用ElementUI显示内容,将json结果集传递给后端
前言
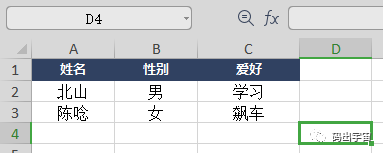
使用Vue读取Excel内的数据需要使用npm安装xlsx,将结果提取出来然后动态渲染到ElementUI的Table中进行结果展示,再一步点击确定来把数据传递给SpringBoot后端加入到数据库中
一、演示
1.选择文件
点击导入按钮后,选择要导入的excel文件

2.查看内容
这里为了演示就把读取到的Excel数据直接展示出来了,后面会介绍如何转换某些特定字段,例如:男女改为0,1
点击确定导入后输出一下要传到后端的数据
二、界面
1.主页面
一个按钮,一个组件,UploadEx 为自定义上传弹框组件,选择文件界面和内容列表界面都在此组件内,想要完成其他Excel文件读取,只需要修改以下两个组件属性和一个方法
excelTitle:要映射的列名
urlStr:后端url
<el-button type="primary" @click="importShow = true">导入</el-button>
<UploadEx :isShow.sync="importShow" :excelTitle="excelTitle" urlStr="/api/excel/import/userinfo"></UploadEx>
data中的内容
data(){
return{
importShow: false,
excelTitle: [],
}
},
在页面created函数中设置excelTitle内容
// 设置导出模板的列
setTitle(){
this.excelTitle = []
let et1 = {'label':'姓名', 'prop':'userName'}
let et2 = {'label':'性别', 'prop':'userSex'}
let et3 = {'label':'爱好', 'prop':'userHobby'}
this.excelTitle.push(et1)
this.excelTitle.push(et2)
this.excelTitle.push(et3)
},
2.组件注册
文件注册大家可以使用import或下面这个方法来全局注册
可以在此组件所在位置声明一个index.js文件
// 公用组件
import uploadEx from './uploadEx.vue' // 文件上传框
const components = {
install: function (Vue) {
// 公用组件
Vue.component('UploadEx', uploadEx)
}
}
export default components
然后main.js中修改,记得找对index.js文件
import components from './xxx/index'
Vue.use(components)
3.组件内容
uploadEx组件HTML内容如下,一个上传框用于选择文件,一个Table列表用于显示Excel内容
<template>
<div>
<el-dialog title="导入" :visible="isShow" :show-close='false' width="40%" @before-close="importClose">
<el-upload style="margin: 10px auto;"
drag
action=""
:on-change="handleChange"
:show-file-list="false"
:on-remove="handleRemove"
:file-list="fileListUpload"
:limit="1"
accept=".csv, application/vnd.openxmlformats-officedocument.spreadsheetml.sheet, application/vnd.ms-excel"
:auto-upload="false">
<i class="el-icon-upload"></i>
<div class="el-upload__text">点击上传</div>
<div class="el-upload__tip" slot="tip">只能上传xlsx和xls格式的且大小必须小于2M</div>
</el-upload>
<span slot="footer" class="dialog-footer">
<el-button @click="importClose()">取消</el-button>
</span>
</el-dialog>
<el-dialog
title="Excel内容" :visible.sync="excelShow" width="60%" center>
<el-table
:data="excelData"
ref="excelDataRef"
border
style="width: 100%;height:300px;overflow-y:scroll;">
<template v-for='(col,index) in excelTitle'>
<el-table-column
:prop="col.prop"
:label="col.label"
:key="index">
</el-table-column>
</template>
</el-table>
<span slot="footer" class="dialog-footer">
<el-button @click="excelShow = false;fileTemp = null;fileListUpload = []">重新选择</el-button>
<el-button type="primary" @click="importExcel()">确定导入</el-button>
</span>
</el-dialog>
</div>
</template>
样式就是随便加个吧
<style lang="scss">
.el-upload{
.el-upload-dragger{
background-color: rgb(13, 57, 128);
.el-upload__text{
color: white;
}
}
.el-upload-dragger:hover{
box-shadow: 5px 5px 15px #0f64c5ad;
border: 1px solid #0f64c5ad;
}
}
</style>
接下来是js内容,其中我们要引入一个ImportExcel工具文件,文件在本部分的下面
<script>
import { importEx } from '@/libs/ImportExcel'
export default {
name: "uploadEx",
props: ["isShow","excelTitle","urlStr"],
data() {
return {
fileTemp: undefined,
excelShow: false,
excelData: [],
fileListUpload: [],
};
},
mounted() {
},
methods: {
// 判断文件格式
handleChange(file, fileList) {
this.fileTemp = file.raw
let fileName = file.raw.name
let fileType = fileName.substring(fileName.lastIndexOf('.') + 1);
if (this.fileTemp) {
if ((fileType == 'xlsx') || (fileType == 'xls')) {
this.importf(this.fileTemp)
} else {
this.handleRemove()
this.$message({
type: 'warning',
message: '文件格式错误'
})
}
}
},
// 移除Excel表
handleRemove() {
this.fileTemp = null
this.fileListUpload = []
},
// 关闭导入框
importClose(){
this.handleRemove()
this.$emit('update:isShow', false)
},
// 导入数据并传递给表格显示
importf(obj){
var self = this
let arr = []
importEx(this.excelTitle, obj).then(arr => {
if (arr.length==0){
self.$message({message: '没有数据哦',type: 'error',duration: 1500})
self.handleRemove()
return
}
// 可以对空字符数据进行处理,例如某个接口要导入的信息有男女字段,将男女改为0,1
// 这个只是针对/api/excel/import/userinf这个逻辑中的文件进行字段转换,可以加else if来替换其他文件的特殊字段,当然也可以注释掉,那么久需要在后端进行转换了
if (this.urlStr==='/api/excel/import/userinfo'){
for (var ar in arr){
if (arr[ar]['userSex']=='男'){
arr[ar]['userSex'] = 0
} else if (arr[ar]['userSex']=='女'){
arr[ar]['userSex'] = 1
}
}
}
self.excelData = [...arr]
self.excelShow = true
})
},
// 将数据传给后台添加
importExcel(){
console.log(this.excelData)
let self = this
this.$http
.request({
url: this.urlStr,
method: 'POST',
data: this.excelData
}).then(resp => {
// 数据添加成功或失败后清空内容
if (resp && resp.status === 100) {
self.$message({message: '成功',type: 'success',duration: 1500})
self.importClose()
self.$parent.queryMainData()
}else{
self.handleRemove()
self.$message({message: resp.message, type: 'error',duration: 1500})
}
})
this.excelShow = false
},
},
};
</script>
4.Excel读取
这个文件中利用了xlsx来读取内容并转为json,当然这个js文件网上有很多种写法,总之结果可正常转换为json就可以了,最重要的是获取键与值那部分代码
export function importEx(excelTitle, fileobj) {
return new Promise((resolve, reject) => {
var rABS = false; //是否将文件读取为二进制字符串
var f = fileobj
var reader = new FileReader();
FileReader.prototype.readAsBinaryString = function (f) {
var binary = "";
var rABS = false; //是否将文件读取为二进制字符串
var wb; //读取完成的数据
var outdata;
var reader = new FileReader();
reader.onload = function (e) {
var bytes = new Uint8Array(reader.result);
var length = bytes.byteLength;
for (var i = 0; i < length; i++) {
binary += String.fromCharCode(bytes[i]);
}
var XLSX = require('xlsx');
if (rABS) {
wb = XLSX.read(btoa(fixdata(binary)), { //手动转化
type: 'base64'
});
} else {
wb = XLSX.read(binary, {
type: 'binary'
});
}
// outdata => excel导入的数据
outdata = XLSX.utils.sheet_to_json(wb.Sheets[wb.SheetNames[0]]);
let arr = []
outdata.map(v => {
// let jsonString = JSON.stringify(v).replace(/\*/g, '').replace(/\s/ig,'');
let jsonString = JSON.stringify(v).replace(/\//g, '');
v = JSON.parse(jsonString);
let obj = {}
// 自动获取键与值
for (var k1 in v){
for (var et in excelTitle){
if (excelTitle[et].label==k1){
var col_key = excelTitle[et].prop
var col_val = v[k1]
obj[col_key] = col_val
}
}
}
arr.push(obj)
})
resolve(arr);
}
reader.readAsArrayBuffer(f);
}
if (rABS) {
reader.readAsArrayBuffer(f);
} else {
reader.readAsBinaryString(f);
}
reader.onerror = reject;
})
}
然后,后端代码就不用展示了,你就怼个对应的实体类随便接受吧
总结
然后在需要进行导入操作的页面使用UploadEx组件,并且设置两个属性和一个方法,基本就可以完成操作了。
当然有好处也有坏处,不同的xlsx文件处理需要进行不同的设置,但是对于用户来说展示很友好,而且方便定义数据列名,但是对于一个文件几十个列,那就当我没说吧唉。大家可以对其自行扩展哦!
作者:小码哥
欢迎关注微信公众号 :码出宇宙
扫描添加好友邀你进技术交流群,加我时注明【姓名+公司(学校)+职位】


 个人中心
个人中心 退出
退出


 分类导航
分类导航