

 个人中心
个人中心 退出
退出


如何将传统 Web 框架部署到 Serverless
如何将传统 Web 框架部署到 Serverless
https://www.zoo.team/article/serverless-web
背景
因为 Serverless 的“无服务器架构”应用相比于传统应用有很多优点,比如:无需关心服务器、免运维、弹性伸缩、按需付费、开发可以更加关注业务逻辑等等,所以现在 Serverless 应用已经逐渐广泛起来。
但是目前原生的 Serverless 开发框架还比较少,也没有那么成熟,另外主流的 Web 框架还不支持直接 Serverless 部署,但好在是现在国内各大云厂商比如阿里云、腾讯云已经提供能力能够将我们的传统框架以简单、快速、科学的方式部署到 Serverless 上,下面让我们一起研究看看它们是怎么做的吧。
我们以 Node.js 的 Express 应用为例,看看如何通过阿里云函数计算,实现不用按照传统部署方式购买云主机去部署,不用自己运维,快速部署到 Serverless 平台上。
传统应用与函数计算的入口差异
传统应用的入口文件
首先看下传统 Express 应用的入口文件:
const express = require('express')
const app = express()
const port = 3000
// 监听 / 路由,处理请求
app.get('/', (req, res) => {
res.send('Hello World!')
})
// 监听 3000 端口,启动 HTTP 服务
app.listen(port, () => {
console.log(`Example app listening on port ${port}`)
})
可以看到传统 Express 应用是:
1.通过 app.listen() 启动了 HTTP 服务,其本质上是调用的 Node.js http 模块的 createServer() 方法创建了一个 HTTP Server
2.监听了 / 路由,由回调函数 function(request, response) 处理请求
函数计算的入口函数
Serverless 应用中, FaaS 是基于事件触发的,触发器是触发函数执行的方式, 其中 API 网关触发器与 HTTP 触发器与均可应用于 Web应用的创建。函数计算会从指定的入口函数开始执行,其中 API 网关触发器对应的入口函数叫事件函数,HTTP 触发器对应的入口函数叫 HTTP 函数,它们的入口函数形式不同。
API 网关触发器的入口函数形式
API 网关触发器的入口函数形式如下,函数入参包括 event、context、callback,以 Node.js 为例,如下:
/*
* handler: 函数名 handler 需要与创建函数时的 handler 字段相对应。例如创建函数时指定的 handler 为 index.handler,那么函数计算会去加载 index.js 文件中定义的 handler 函数
* event: 您调用函数时传入的数据,其类型是 Buffer,是函数的输入参数。您在函数中可以根据实际情况对 event 进行转换。如果输入数据是一个 JSON 字符串 ,您可以把它转换成一个 Object。
* context: 包含一些函数的运行信息,例如 request Id、 临时 AK 等。您在代码中可以使用这些信息
* callback: 由系统定义的函数,作为入口函数的入参用于返回调用函数的结果,标识函数执行结束。与 Node.js 中使用的 callback 一样,它的第一个参数是 error,第二个参数 data。
*/
module.exports.handler = (event, context, callback) => {
// 处理业务逻辑
callback(null, data);
};
HTTP 触发器的入口函数形式
一个简单的 Node.js HTTP 函数示例如下所示:
module.exports.handler = function(request, response, context) {
response.send("hello world");
}
差异对比
对比可以看出,在传统应用中,是启动一个服务监听端口号去处理 HTTP 请求,服务处理的是 HTTP 的请求和响应参数;而在 Serverless 应用中, Faas 是基于事件触发的,触发器类型不同,参数映射和处理不同:
若是 API 网关触发器
当有请求到达后端服务设置为函数计算的 API 网关时,API 网关会触发函数的执行,触发器会将事件信息生成 event 参数,然后 FaaS 以 event 为参数执行入口函数,最后将执行结果返回给 API 网关。所以传统应用和 Serverless 应用在请求响应方式和参数的数据结构上都有很大差异,要想办法让函数计算的入口方法适配 express。
若是 HTTP 触发器
相对 API 网关触发器参数处理会简单些。因为 HTTP 触发器通过发送 HTTP 请求触发函数执行,会把真实的 HTTP 请求直接传递给 FaaS 平台,不需要编码或解码成 JSON 格式,不用增加转换逻辑,性能也更优。
适配层
下面我们通过解读阿里云 FC 提供的将函数计算的请求转发给 express 应用的 npm 包 @webserverless/fc-express 源码,看看函数计算的入口方法是如何适配 express 的,如何适配 API 网关 和 HTTP 触发器这两种类型。
根据上述分析,Web 应用若想 Serverless 化需要开发一个适配层,将函数计算接收到的请求转发给 express 应用处理,最后再返回给函数计算。
API 网关触发的适配层
实现原理
API 网关触发的情况下,通过适配层将 FaaS 函数接收到的 API 网关事件参数 event 先转化为标准的 HTTP 请求,再去让传统 Web 服务去处理请求和响应,最后再将 HTTP 响应转换为函数返回值。整体工作原理如下图所示: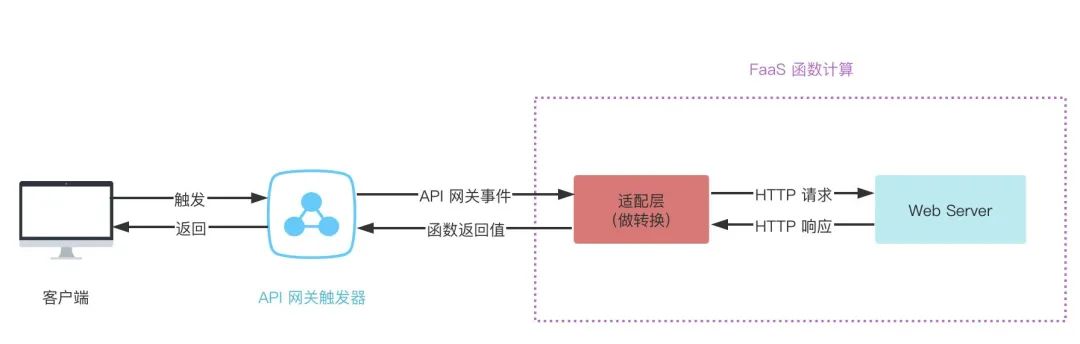
适配层核心就是:把 event 映射到 express 的 request 对象上, 再把 express 的 response 对象映射到 callback 的数据参数上。
API 网关调用函数计算的事件函数时,会将 API 的相关数据转换为 Map 形式传给函数计算服务。函数计算服务处理后,按照下图中 Output Format 的格式返回 statusCode、headers、body 等相关数据。API 网关再将函数计算返回的内容映射到 statusCode、header、body等位置返回给客户端。
(此图来源于阿里云)
核心过程
通过分析 @webserverless/fc-express 源码,我们可以抽取核心过程实现一个简易版的适配层。
1.创建一个自定义 HTTP Server,通过监听 Unix Domain Socket,启动服务
(友情链接:不清楚 Unix Domain Socket 的小伙伴可以先看下这篇文章: Unix domain socket 简介 (https://www.cnblogs.com/sparkdev/p/8359028.html))
第一步我们若想把函数计算接收的 event 参数映射到 Express.js 的 request 对象上,就需要创建并启动一个自定义的 HTTP 服务来代替 Express.js 的 app.listen,然后接下来就可以将函数的事件参数 event 转换为 Express.js 的 request 请求参数。
首先创建一个 server.js 文件如下:
// server.js
const http = require('http');
const ApiGatewayProxy = require('./api-gateway-proxy');// api-gateway-proxy.js 文件下一步会说明其内容
/*
* requestListener:被代理的 express 应用
* serverListenCallback:http 代理服务开始监听的回调函数
* binaryTypes: 当 express 应用的响应头 content-type 符合 binaryTypes 中定义的任意规则,则返回给 API 网关的 isBase64Encoded 属性为 true
*/
function Server(requestListener,serverListenCallback,binaryTypes) {
this.apiGatewayProxy = new ApiGatewayProxy(this); // ApiGatewayProxy 核心过程 2 会介绍
this.server = http.createServer(requestListener);// 1.1 创建一个自定义 HTTP Server
this.socketPathSuffix = getRandomString(); // 随机生成一个字符串,作为 Unix Domain Socket 使用
this.binaryTypes = binaryTypes ? binaryTypes.slice() : [];// 当 express 应用响应的 content-type 符合 Server 构造函数参数 binaryTypes 中定义的任意规则时,则函数的返回值的 isBase64Encoded 为 true,从而告诉 API 网关如何解析函数返回值的 body 参数
this.server.on("listening", () => {
this.isListening = true;
if (serverListenCallback) serverListenCallback();
});
this.server.on("close", () => {
this.isListening = false;
}).on("error", (error) => {
// 异常处理
});
}
// 暴露给函数计算入口函数 handler 调用的方法
Server.prototype.proxy = function (event, context, callback) {
const e = JSON.parse(event);
this.apiGatewayProxy.handle({
event: e,
context,
callback
});
}
// 1.2 启动服务
Server.prototype.startServer = function () {
return this.server.listen(this.getSocketPath()); // 采用监听 Unix Domain Socket 方式启动服务,减少函数执行时间,节约成本
}
Server.prototype.getSocketPath = function () {
/* istanbul ignore if */
/* only running tests on Linux; Window support is for local dev only */
if (/^win/.test(process.platform)) {
const path = require('path');
return path.join('\\\\?\\pipe', process.cwd(), `server-${this.socketPathSuffix}`);
} else {
return `/tmp/server-${this.socketPathSuffix}.sock`;
}
}
function getRandomString() {
return Math.random().toString(36).substring(2, 15);
}
module.exports = Server;
在 server.js 中,我们定义了一个构造函数 Server 并导出。在 Server 中,我们创建了一个自定义的 HTTP 服务,然后随机生成了一个 Unix Domain Socket,采用监听该 Socket 方式启动服务来代替 Express.js 的 app.listen。
2.将函数计算参数 event 转换为 Express.js 的 HTTP request
下面开始第 2 步,创建一个 api-gateway-proxy.js 文件,将函数计算参数 event 转换为 Express.js 的 HTTP request。
//api-gateway-proxy.js
const http = require('http');
const isType = require('type-is');
function ApiGatewayProxy(server) {
this.server = server;
}
ApiGatewayProxy.prototype.handle = function ({
event,
context,
callback
}) {
this.server.startServer()
.on('listening', () => {
this.forwardRequestToNodeServer({
event,
context,
callback
});
});
}
ApiGatewayProxy.prototype.forwardRequestToNodeServer = function ({
event,
context,
callback
}) {
const resolver = data => callback(null, data);
try {
// 2.1将 API 网关事件转换为 HTTP request
const requestOptions = this.mapContextToHttpRequest({
event,
context,
callback
});
// 2.2 通过 http.request() 将 HTTP request 转发给 Node.js Server 处理,发起 HTTP 请求
const req = http.request(requestOptions, response => this.forwardResponse(response, resolver));
req.on('error', error => {
//...
});
req.end();
} catch (error) {
// ...
}
}
ApiGatewayProxy.prototype.mapContextToHttpRequest = function ({
event,
context,
callback
}) {
const headers = Object.assign({}, event.headers);
return {
method: event.httpMethod,
path: event.path,
headers,
socketPath: this.server.getSocketPath()
// protocol: `${headers['X-Forwarded-Proto']}:`,
// host: headers.Host,
// hostname: headers.Host, // Alias for host
// port: headers['X-Forwarded-Port']
};
}
// 核心过程 3 会介绍
ApiGatewayProxy.prototype.forwardResponse = function (response, resolver) {
const buf = [];
response
.on('data', chunk => buf.push(chunk))
.on('end', () => {
const bodyBuffer = Buffer.concat(buf);
const statusCode = response.statusCode;
const headers = response.headers;
const contentType = headers['content-type'] ? headers['content-type'].split(';')[0] : '';
const isBase64Encoded = this.server.binaryTypes && this.server.binaryTypes.length > 0 && !!isType.is(contentType, this.server.binaryTypes);
const body = bodyBuffer.toString(isBase64Encoded ? 'base64' : 'utf8');
const successResponse = {
statusCode,
body,
headers,
isBase64Encoded
};
resolver(successResponse);
});
}
module.exports = ApiGatewayProxy;
在 api-gateway-proxy.js 中,我们定义了一个构造函数 ApiGatewayProxy 并导出。在这里我们会将 event 转换为 HTTP request,然后向 Node.js Server 发起请求,由 Node.js Server 再进行处理做出响应。
3.将 HTTP response 转换为 API 网关标准数据结构,作为 callback 的参数返回给 API 网关
接着继续对 api-gateway-proxy.js 文件中的http.request(requestOptions, response => this.forwardResponse(response, resolver))分析发出 HTTP 请求后的响应处理部分。
//api-gateway-proxy.js
ApiGatewayProxy.prototype.forwardRequestToNodeServer = function ({
event,
context,
callback
}) {
const resolver = data => callback(null, data); // 封装 callback 为 resolver
//...
// 请求、响应
const req = http.request(requestOptions, response => this.forwardResponse(response, resolver));
//...
}
//3.Node.js Server 对 HTTP 响应进行处理,将 HTTP response 转换为 API 网关标准数据结构,作为函数计算返回值
ApiGatewayProxy.prototype.forwardResponse = function (response, resolver) {
const buf = [];
response
.on('data', chunk => buf.push(chunk))
.on('end', () => {
const bodyBuffer = Buffer.concat(buf);
const statusCode = response.statusCode;
const headers = response.headers;
const contentType = headers['content-type'] ? headers['content-type'].split(';')[0] : '';
const isBase64Encoded = this.server.binaryTypes && this.server.binaryTypes.length > 0 && !!isType.is(contentType, this.server.binaryTypes);
const body = bodyBuffer.toString(isBase64Encoded ? 'base64' : 'utf8');
// 函数返回值
const successResponse = {
statusCode,
body,
headers,
isBase64Encoded //当函数的 event.isBase64Encoded 是 true 时,会按照 base64 编码来解析 event.body,并透传给 express 应用,否则就按照默认的编码方式来解析,默认是 utf8
};
// 将 API 网关标准数据结构作为回调 callback 参数,执行 callback,返回给 API 网关
resolver(successResponse);
});
}
接着第 2 步,Node.js Server 对 http.request() 发出的 HTTP 请求做出响应处理,将 HTTP response 转换为 API 网关标准数据结构,把它作为回调 callback 的参数,调用 callback 返回给 API 网关。
4.在入口函数中引入适配层代码并调用
以上 3 步就将适配层核心代码完成了,整个过程就是:将 API 网关事件转换成 HTTP 请求,通过本地 socket 和函数起 Node.js Server 进行通信。
最后我们在入口函数所在文件 index.js 中引入 server.js,先用 Server 构建一个 HTTP 代理服务,然后在入口函数 handler 中调用 server.proxy(event, context, callback); 即可将函数计算的请求转发给 express 应用处理。
// index.js
const express = require('express');
const Server = require('./server.js');
const app = express();
app.all('*', (req, res) => {
res.send('express-app hello world!');
});
const server = new Server(app); // 创建一个自定义 HTTP Server
module.exports.handler = function(event, context, callback) {
server.proxy(event, context, callback); // server.proxy 将函数计算的请求转发到 express 应用
};
我们将以上代码在 FC 上部署、调用,执行成功结果如下:
HTTP 触发的适配层
实现原理
HTTP 触发的情况下,不用对请求参数做转换,其它原理与 API 网关触发器一致:通过适配层将 FaaS 函数接收到的请求参数直接转发到自定义的 Web 服务内,最后再将 HTTP 响应包装返回即可,整体工作原理如下图所示:
核心过程
同样我们抽取核心过程简单实现一个适配层,与 API 网关触发器原理相同的部分将不再赘述 。
1.创建一个自定义 HTTP Server,通过监听 Unix Domain Socket,启动服务
server.js 代码如下:
// server.js
const http = require('http');
const HttpTriggerProxy = require('./http-trigger-proxy');
function Server(requestListener,serverListenCallback) {
this.httpTriggerProxy = new HttpTriggerProxy(this);
this.server = http.createServer(requestListener); // 1.1 创建一个自定义 HTTP Server
this.socketPathSuffix = getRandomString();
this.server.on("listening", () => {
this.isListening = true;
if (serverListenCallback) serverListenCallback();
});
this.server.on("close", () => {
this.isListening = false;
}).on("error", (error) => {
// 异常处理,例如判读 socket 是否已被监听
});
}
// 暴露给函数计算入口函数 handler 调用的方法
Server.prototype.httpProxy = function (request, response, context) {
this.httpTriggerProxy.handle({ request, response, context });
}
// 1.2 启动服务
Server.prototype.startServer = function () {
return this.server.listen(this.getSocketPath());
}
Server.prototype.getSocketPath = function () {
/* istanbul ignore if */
/* only running tests on Linux; Window support is for local dev only */
if (/^win/.test(process.platform)) {
const path = require('path');
return path.join('\\\\?\\pipe', process.cwd(), `server-${this.socketPathSuffix}`);
} else {
return `/tmp/server-${this.socketPathSuffix}.sock`;
}
}
function getRandomString() {
return Math.random().toString(36).substring(2, 15);
}
module.exports = Server;
2.将 HTTP request 直接转发给 Web Server,再将 HTTP response 包装返回
创建一个 api-trigger-proxy.js 文件如下:
// api-trigger-proxy.js
const http = require('http');
const isType = require('type-is');
const url = require('url');
const getRawBody = require('raw-body');
function HttpTriggerProxy(server) {
this.server = server;
}
HttpTriggerProxy.prototype.handle = function ({
request,
response,
context
}) {
this.server.startServer()
.on('listening', () => {
this.forwardRequestToNodeServer({
request,
response,
context
});
});
}
HttpTriggerProxy.prototype.forwardRequestToNodeServer = function ({
request,
response,
context
}) {
// 封装 resolver
const resolver = data => {
response.setStatusCode(data.statusCode);
for (const key in data.headers) {
if (data.headers.hasOwnProperty(key)) {
const value = data.headers[key];
response.setHeader(key, value);
}
}
response.send(data.body); // 返回 response body
};
try {
// 透传 request
const requestOptions = this.mapContextToHttpRequest({
request,
context
});
// 2.将 HTTP request 直接转发给 Web Server,再将 HTTP response 包装返回
const req = http.request(requestOptions, response => this.forwardResponse(response, resolver));
req.on('error', error => {
// ...
});
// http 触发器类型支持自定义 body:可以获取自定义 body
if (request.body) {
req.write(request.body);
req.end();
} else {
// 若没有自定义 body:http 触发器触发函数,会通过流的方式传输 body 信息,可以通过 npm 包 raw-body 来获取
getRawBody(request, (err, body) => {
req.write(body);
req.end();
});
}
} catch (error) {
// ...
}
}
HttpTriggerProxy.prototype.mapContextToHttpRequest = function ({
request,
context
}) {
const headers = Object.assign({}, request.headers);
headers['x-fc-express-context'] = encodeURIComponent(JSON.stringify(context));
return {
method: request.method,
path: url.format({ pathname: request.path, query: request.queries }),
headers,
socketPath: this.server.getSocketPath()
// protocol: `${headers['X-Forwarded-Proto']}:`,
// host: headers.Host,
// hostname: headers.Host, // Alias for host
// port: headers['X-Forwarded-Port']
};
}
HttpTriggerProxy.prototype.forwardResponse = function (response, resolver) {
const buf = [];
response
.on('data', chunk => buf.push(chunk))
.on('end', () => {
const bodyBuffer = Buffer.concat(buf);
const statusCode = response.statusCode;
const headers = response.headers;
const contentType = headers['content-type'] ? headers['content-type'].split(';')[0] : '';
const isBase64Encoded = this.server.binaryTypes && this.server.binaryTypes.length > 0 && !!isType.is(contentType, this.server.binaryTypes);
const body = bodyBuffer.toString(isBase64Encoded ? 'base64' : 'utf8');
const successResponse = {
statusCode,
body,
headers,
isBase64Encoded
};
resolver(successResponse);
});
}
module.exports = HttpTriggerProxy;
3.入口函数引入适配层代码
// index.js
const express = require('express');
const Server = require('./server.js');
const app = express();
app.all('*', (req, res) => {
res.send('express-app-httpTrigger hello world!');
});
const server = new Server(app);
module.exports.handler = function (req, res, context) {
server.httpProxy(req, res, context);
};
同样地,我们将以上代码在 FC 上部署、调用,执行成功结果如下:
看到最后,大家会发现 API 网关触发器和 HTTP 触发器很多代码逻辑是可以复用的,大家可以自行阅读优秀的源码是如何实现的~
其他部署到 Serverless 平台的方案
将传统 Web 框架部署到 Serverless 除了通过适配层转换实现,还可以通过 Custom Runtime 或者 Custom Container Runtime (https://juejin.cn/post/6981921291980767269#heading-5) ,3 种方案总结如下:
通过引入适配层,将函数计算接收的事件参数转换为 HTTP 请求交给自定义的 Web Server 处理
通过 Custom Runtime
本质上也是一个 HTTP Server,接管了函数计算平台的所有请求,包括事件调用或者 HTTP 函数调用等
开发者需要创建一个启动目标 Server 的可执行文件 bootstrap
通过 Custom Container Runtime
工作原理与 Custom Runtime 基本相同
开发者需要把应用代码和运行环境打包为 Docker 镜像
小结
本文介绍了传统 Web 框架如何部署到 Serverless 平台的方案:可以通过适配层和自定义(容器)运行时。其中主要以 Express.js 和阿里云函数计算为例讲解了通过适配层实现的原理和核心过程,其它 Web 框架 Serverless 化的原理也基本一致,腾讯云也提供了原理一样的 tencent-serverless-http (https://github.com/serverless-plus/tencent-serverless-http) 方便大家直接使用(但腾讯云不支持 HTTP 触发器),大家可以将自己所使用的 Web 框架对照云厂商函数计算的使用方法亲自开发一个适配层实践一下~
参考资料
Webserverless - FC Express extension (https://github.com/awesome-fc/webserverless/tree/master/packages/fc-express)
如何将 Web 框架迁移到 Serverless (https://zhuanlan.zhihu.com/p/152391799)
Serverless 工程实践 | 传统 Web 框架迁移 (https://developer.aliyun.com/article/790302)
阿里云-触发器简介 (https://help.aliyun.com/document_detail/53102.html)
前端学 serverless 系列—— WebApplication 迁移实践 (https://zhuanlan.zhihu.com/p/72076708)
作者:雪霁
欢迎关注微信公众号 :政采云前端团队

 分类导航
分类导航