
 个人中心
个人中心 退出
退出


手把手教你手写一个RPC
文章目录
介绍
SPI
如何使用SPI?
服务端
ZK注册中心
客户端
负载均衡
服务端处理数据
如何使用
结尾
在之前的文章中对实现Rpc以及dubbo中的SPI机制有了一些了解,为了更进一步了解rpc调用的整个过程,在本篇中我们会自己实现简单的SPI机制、实现zookeeper注册中心、负载均衡等功能。源码的链接我会放在文章的末尾,如果有需要的话可以clone下来,debug整个项目,这样也可以对整个rpc调用过程更加清楚。OK,废话不多说啦,接下来就是展示它的功能。
介绍
为了方便对功能进行管理,这里进行了多模块划分: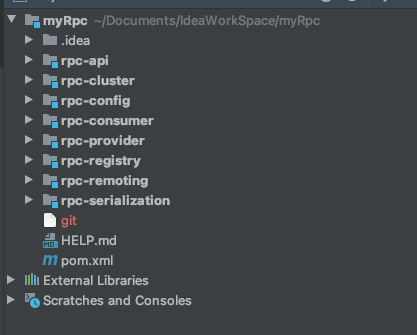
这个见名字就知道模块是负责什么的了,比如api模块就是专门负责存放接口的,cluster就是容错部分,这里就是负载均衡那块啦。
在上一篇文章中,我们就知道了在dubbo中,SPI可以说是它的核心部分了,所以我们也先从SPI部分说起。
SPI
如何使用SPI?
这个与dubbo中的基本一样,在META-INF下建一个extensions包,以接口名为文件名。在文件中,使用key-value的形式来设置它的实现类:
SPI的具体实现类为ExtensionLoader,他与dubbo基本上是一样,可以说是dubbo中弱化版的实现。相信看了上一篇文章的话,再看这个SPI的实现,简直就是小菜一碟。
服务端
在dubbo中有xml形式、注解形式来提供服务,这篇文章中以注解的方式来实现提供服务。所以我们要先定义一个服务端的注解,以便将这个注解添加到实现类上:
@Documented
@Retention(RetentionPolicy.RUNTIME)
@Target({ElementType.TYPE})
@Inherited
public @interface Service {
String interfaceName() default "";
String version() default "";
String group() default "";
}
将这个注解添加到实现类上就可以了,我们启动下服务端:
public class AnnotationProvider {
public static void main(String[] args) throws IOException {
new AnnotationConfigApplicationContext(ProviderComponentScan.class);
//启动netty
NettyRpcServer nettyRpcServer=new NettyRpcServer();
nettyRpcServer.start();
}
@Configuration
@RpcComponentScan(basePackages = {"com.xlfc.provider.impl"})
static public class ProviderComponentScan{
}
}
仅仅将注解添加到实现类上是不行的,因为它没有进入到spring容器,我们的spring也就无法处理它,所以接下来就是要spring扫描到这些类:
@Override
public void registerBeanDefinitions(AnnotationMetadata annotationMetadata, BeanDefinitionRegistry beanDefinitionRegistry) {
CustomScanner rpcServiceScanner=new CustomScanner(beanDefinitionRegistry, Service.class);
CustomScanner springBeanScanner=new CustomScanner(beanDefinitionRegistry, Component.class);
if (resourceLoader!=null){
rpcServiceScanner.setResourceLoader(resourceLoader);
springBeanScanner.setResourceLoader(resourceLoader);
}
String[] packageToScan=getPackageToScan(annotationMetadata);
//其实就是扫描包下面有这些注解的类,将其加入到容器中后才可以使用。
springBeanScanner.scan(SPRING_BEAN_BASE_PACKAGE);
rpcServiceScanner.scan(packageToScan);
}
/**
* 获取到需要扫描的内容
* */
private String[] getPackageToScan(AnnotationMetadata annotationMetadata) {
String[] packageToScan=new String[0];
//可见DubboComponentScanRegistrar的getPackagesToScan0方法
AnnotationAttributes attributes = AnnotationAttributes.fromMap(
annotationMetadata.getAnnotationAttributes(annotationClass.getName()));
if (attributes!=null){
packageToScan=attributes.getStringArray(BASE_PACKAGE_ATTRIBUTE_NAME);
}
//说明是没有扫描的
if (packageToScan.length==0){
packageToScan=new String[]{((StandardAnnotationMetadata)annotationMetadata).getIntrospectedClass().getPackage().getName()};
}
return packageToScan;
}
这一步就是让spring扫描到@Service标记的文件,关于这一部分dubbo中实现的更加深入,如果想了解更多,可以去看DubboComponentScanRegistrar的getPackagesToScan0。
这样spring在扫描到文件中后,就可以在容器加载完毕时对其进行一些处理。通过实现ApplicationListener来重写onApplicationEvent方法:
@SneakyThrows
@Override
public void onApplicationEvent(ContextRefreshedEvent event) {
if (Objects.isNull(event.getApplicationContext().getParent())){
ApplicationContext context = event.getApplicationContext();
//处理提供端/生产者
handlerProvider(context);
//处理消费端
handlerConsumer(context);
}
}
@SneakyThrows
private void handlerProvider(ApplicationContext context) throws UnknownHostException {
Map<String, Object> beans = context.getBeansWithAnnotation(Service.class);
String host = InetAddress.getLocalHost().getHostAddress();
if (!beans.isEmpty()){
for (Object bean:beans.values()){
Service service = bean.getClass().getAnnotation(Service.class);
RpcService rpcServiceConfig=new RpcService(host,PORT,bean,service.version(),service.group());
serviceProvider.register(rpcServiceConfig);
}
}
}
因为是服务端嘛,所以这个信息是必须要注册到注册中心的。dubbo是以zookeeper为默认的注册中心的,这里我们就也已zookeeper为注册中心。
ZK注册中心
使用zk为注册中心,大部分功能可以直接使用org.apache.curator里面的方法:
@Override
public void register(RpcService rpcService) {
this.addService(rpcService);
InetSocketAddress address = new InetSocketAddress(rpcService.getHost(), rpcService.getPort());
String servicePath= RpcConstants.ZK_REGISTER_ROOT_PATH+"/"+rpcService.getServiceName()+rpcService.getGroup()+rpcService.getVersion()+address;
ZookeeperUtils.createPersistentNode(zkClient,servicePath);
}
public static void createPersistentNode(CuratorFramework zkClient, String path) {
try {
if (!(REGISTERED_PATH_SET.contains(path) || zkClient.checkExists().forPath(path) != null)) {
zkClient.create().creatingParentsIfNeeded().withMode(CreateMode.PERSISTENT).forPath(path);
}
REGISTERED_PATH_SET.add(path);
} catch (Exception e) {
log.error("create persistent node for path [{}] fail", path);
}
}
我们可以通过ZooInspector这个软件来看zookeeper注册的信息:
zookeeper有了服务信息,我们才可以为客户端提供服务。
客户端
服务端有自定义的注解,那么客户端也要定义一个注解,这样才能够知道哪些地方需要服务:
@Documented
@Retention(RetentionPolicy.RUNTIME)
@Target({ElementType.FIELD})
@Inherited
public @interface Reference {
String interfaceName() default "";
String version() default "";
String group() default "";
}
public class AnnotationConsumer {
public static void main(String[] args) throws IOException {
AnnotationConfigApplicationContext annotationConfigApplicationContext = new AnnotationConfigApplicationContext(ProviderComponentScan.class);
annotationConfigApplicationContext.start();
final HelloController helloController = (HelloController) annotationConfigApplicationContext.getBean("helloController");
helloController.test();
System.in.read();
}
@Configuration
@RpcComponentScan(basePackages = {"com.xlfc.consumer"})
static public class ProviderComponentScan{
}
}
在上面的将服务端@Service注解的类添加进spring扫描的地方,我们将客户端@Reference也添加进去了。所以只需要在spring加载完毕后对@Reference相关类进行一些处理。
@SneakyThrows
@Override
public void onApplicationEvent(ContextRefreshedEvent event) {
if (Objects.isNull(event.getApplicationContext().getParent())){
ApplicationContext context = event.getApplicationContext();
//处理提供端/生产者
handlerProvider(context);
//处理消费端
handlerConsumer(context);
}
}
private void handlerConsumer(ApplicationContext context) {
Map<String, Object> beans = context.getBeansWithAnnotation(Component.class);
if (!beans.isEmpty()){
for (Object bean:beans.values()){
Class<?> targetClass = bean.getClass();
Field[] declaredFields =targetClass.getDeclaredFields();
for (Field declaredField:declaredFields){
Reference rpcReference = declaredField.getAnnotation(Reference.class);
if (rpcReference!=null){
RpcService rpcServiceConfig=new RpcService(rpcReference.version(),rpcReference.group());
RpcClientProxy rpcClientProxy=new RpcClientProxy(rpcClient,rpcServiceConfig);
Object clientProxy=rpcClientProxy.getProxy(declaredField.getType());
declaredField.setAccessible(true);
try {
declaredField.set(bean,clientProxy);
} catch (IllegalAccessException e) {
e.printStackTrace();
}
}
}
}
}
}
我们获得的是一个接口,如果才能调用对象的方法呢?没错,就是生成一个代理类,这样就可以通过调用代理类来执行它的方法:
public <T> T getProxy(Class<?> clazz) {
return (T) Proxy.newProxyInstance(clazz.getClassLoader(), new Class<?>[]{clazz},new ConsumerInvocationHandler());
}
执行代理类时的操作,通过使用CompletableFuture,保证最后一定可以获得该方法的结果。当然也可以使用countDownLatch来保证最后一定获得执行结果,两种方式都可以,无非是实现过程不一样:
private class ConsumerInvocationHandler implements InvocationHandler{
@Override
public Object invoke(Object proxy, Method method, Object[] args) throws Throwable {
RpcRequest rpcRequest=new RpcRequest(method,args,rpcServiceConfig);
RpcResponse<Object> rpcResponse=null;
CompletableFuture<RpcResponse<Object>> completableFuture= (CompletableFuture<RpcResponse<Object>>) rpcRequestTransport.sendRpcRequest(rpcRequest);
rpcResponse=completableFuture.get();
return rpcResponse.getData();
}
}
接下来就是要获取注册中心中的信息,然后根据负载均衡选出一个合适的ip,开启netty进行访问:
@Override
public Object sendRpcRequest(RpcRequest rpcRequest) throws Exception {
CompletableFuture<RpcResponse<Object>> resultFuture = new CompletableFuture<>();
InetSocketAddress inetSocketAddress = serviceConsumer.getIpAndPort(rpcRequest);//获取到ip与地址。
Channel channel=getChannel(inetSocketAddress);
if (channel.isActive()){
NettyClientHandler.COMPLETABLE_CLIENT.put(rpcRequest.getRequestId(),resultFuture);
RpcMessage rpcMessage=this.createRpcMessage(rpcRequest);
channel.writeAndFlush(rpcMessage).addListener((ChannelFutureListener) future->{
if (!future.isSuccess()){
future.channel().close();
resultFuture.completeExceptionally(future.cause());
}
});
}else{
throw new IllegalStateException();
}
return resultFuture;
}
负载均衡
在dubbo中负载均衡算法有很多,比如像随机、权重轮询、一致性hash等等,这里我们只是实现一个简单的随机。
将负载均衡作为一个SPI接口:
@SPI
public interface LoadBalance {
String selectServiceAddress(List<String> serviceAddresses, RpcRequest rpcRequest);
}
public abstract class AbstractLoadBalance implements LoadBalance {
@Override
public String selectServiceAddress(List<String> serviceAddresses, RpcRequest rpcRequest) {
if (serviceAddresses==null || serviceAddresses.isEmpty()){
return null;
}
if (serviceAddresses.size()==1){
return serviceAddresses.get(0);
}
return doSelect(serviceAddresses,rpcRequest);
}
protected abstract String doSelect(List<String> serviceAddresses, RpcRequest rpcRequest) ;
}
public class RandomLoadBalance extends AbstractLoadBalance {
@Override
protected String doSelect(List<String> serviceAddresses, RpcRequest rpcRequest) {
Random random=new Random();
return serviceAddresses.get(random.nextInt(serviceAddresses.size()));
}
}
因为有SPI机制,如果想扩展负载均衡算法也是极为方便的。
有了接口名就可以以它为查询条件,在zk中找到有哪些ip提供这个服务,根据这些提供服务的地址呢,可以坐下负载均衡,得到最后要执行的ip。
public InetSocketAddress getIpAndPort(RpcRequest rpcRequest) {
String rpcServiceName = rpcRequest.getRpcServiceName();
CuratorFramework zkClient = ZookeeperUtils.getZkClient();
List<String> serviceUrlList = ZookeeperUtils.getChildrenNodes(zkClient,rpcServiceName);
if (serviceUrlList==null || serviceUrlList.size()==0){
throw new RpcException("未找到服务,该服务为:"+rpcServiceName);
}
//做下负载均衡
LoadBalance random = ExtensionLoader.getExtensionLoader(LoadBalance.class).getExtension("random");
// List<String> list=new ArrayList<>();
// for (int i = 0; i < 15; i++) {
// list.add();
// }
// String targetServiceUrl = list.get(0);
String targetServiceUrl = random.selectServiceAddress(serviceUrlList, rpcRequest);
String[] socketAddressArray = targetServiceUrl.split(":");
String host = socketAddressArray[0];
int port = Integer.parseInt(socketAddressArray[1]);
return new InetSocketAddress(host,port);
}
在netty传递数据之前,需要对数据进行编码、序列化等操作。序列化方式有很多,比如像java、hession2、kryo等,在实际效率中还是kryo的效率更高,因此我们就采用这个kryo来进行序列化。
同样为了方便扩展,也是将它设置为SPI接口:
@Override
public byte[] serialize(Object obj) {
try (ByteArrayOutputStream byteArrayOutputStream = new ByteArrayOutputStream();
Output output = new Output(byteArrayOutputStream)) {
Kryo kryo = kryoThreadLocal.get();
kryo.writeObject(output, obj);
kryoThreadLocal.remove();
return output.toBytes();
} catch (Exception e) {
throw new RpcException("序列化失败");
}
}
@Override
public <T> T deserialize(byte[] bytes, Class<T> clazz) {
try (ByteArrayInputStream byteArrayInputStream = new ByteArrayInputStream(bytes);
Input input = new Input(byteArrayInputStream)) {
Kryo kryo = kryoThreadLocal.get();
Object o = kryo.readObject(input, clazz);
kryoThreadLocal.remove();
return clazz.cast(o);
} catch (Exception e) {
throw new RpcException("反序列化失败");
}
}
服务端处理数据
因为是采用Netty来作为通信框架,所以可以继承ChannelInboundHandlerAdapter来重写channelRead方法,这样就可以获取到传递的数据了:
if (messageType == RpcConstants.HEARTBEAT_REQUEST_TYPE) {
rpcMessage.setMessageType(RpcConstants.HEARTBEAT_RESPONSE_TYPE);
rpcMessage.setData(RpcConstants.PONG);
} else {
RpcRequest rpcRequest = (RpcRequest) ((RpcMessage) msg).getData();
log.info("服务端接收一条新消息:请求id为"+rpcRequest.getRequestId()+",接口为"+rpcRequest.getInterfaceName()+",方法为"+rpcRequest.getMethodName());
Object result = this.handlerRequest(rpcRequest);
rpcMessage.setMessageType(RpcConstants.RESPONSE_TYPE);
if (ctx.channel().isActive() && ctx.channel().isWritable()) {
rpcResponse= RpcResponse.success(result, rpcRequest.getRequestId());
} else {
rpcResponse = RpcResponse.fail(RpcResponseCodeEnum.FAIL);
}
rpcMessage.setData(rpcResponse);
}
ctx.writeAndFlush(rpcMessage).addListener(ChannelFutureListener.CLOSE_ON_FAILURE);
通过反射来执行对应的方法:
public Object handlerRequest(RpcRequest invocation) {
Object service = serviceProvider.getService(invocation.getRpcServiceName());
Object result;
try {
Method method = service.getClass().getMethod(invocation.getMethodName(), invocation.getParamTypes());
result = method.invoke(service, invocation.getParameters());
} catch (NoSuchMethodException | IllegalArgumentException | InvocationTargetException | IllegalAccessException e) {
throw new RpcException(e.getMessage(), e);
}
return result;
}
至此就完成了一整条的RPC调用过程。
如何使用
那么下载完项目后如何启动?
在启动之前需要先做一件事,那就是启动zookeeper。在代码中我设置zk的ip为本地,如果是使用云服务器的话,那么是需要修改下ip地址的。
首先要启动服务端的类,切记要先启动服务端的,因为你不提供注册中心数据,人家客户端怎么拉数据嘛;
public class AnnotationProvider {
public static void main(String[] args) throws IOException {
new AnnotationConfigApplicationContext(ProviderComponentScan.class);
//启动netty
NettyRpcServer nettyRpcServer=new NettyRpcServer();
nettyRpcServer.start();
}
@Configuration
@RpcComponentScan(basePackages = {"com.xlfc.provider.impl"})
static public class ProviderComponentScan{
}
}
等待服务端启动完毕后,然后再启动客户端的类:
public class AnnotationConsumer {
public static void main(String[] args) throws IOException {
AnnotationConfigApplicationContext annotationConfigApplicationContext = new AnnotationConfigApplicationContext(ProviderComponentScan.class);
annotationConfigApplicationContext.start();
final HelloController helloController = (HelloController) annotationConfigApplicationContext.getBean("helloController");
helloController.test();
System.in.read();
}
@Configuration
@RpcComponentScan(basePackages = {"com.xlfc.consumer"})
static public class ProviderComponentScan{
}
}
结尾
虽然RPC调用过程不复杂,但是实际上要写出来的话,还是有些坑的,毕竟纸上得来终觉浅,绝知此事要躬行。为此也是参考了dubbo源码以及github上其他人写的的rpc例子。以上就是本文对于这个RPC的介绍了,下面附上它的gitee链接。
https://gitee.com/stylesmile/java_write_frame/tree/master/myRpc
netty实现tomcat(简易版)
消息队列技术点梳理(思维导图版)
关于一个简单接口的高并发测试与优化记录
Java实现线程间的通信的五种方式
手写简单版SpringMVC
使用java手写一个简单的web服务器
idea 插件激活(该方法为备用,建议优先使用我们提供的正版激活)
作者:java知路
欢迎关注微信公众号 :java知路

 分类导航
分类导航